What do I do with the pieces once I take them off the printer?
This will vary depending on whether you have a filament or resin printer. But the basic steps you want to follow are:
1) Remove all supports
2) Sand down/fill any print imperfections and perform surface clean-up as needed.
2) Test assemble the figure
to ensure all articulation elements moves smoothly.
3) Paint the unassembled parts.
4) Assemble and glue together all pieces per the instructions provided with the figure.
5) Perform final paint touch-up on the finished figure.
6) Spray the figure with a final protective coating of clear matt/satin varnish (optional)
For resin, see my notes in the SLA section of this FAQ regarding setting up your wash and cure station and tools and add-ons, because there are several additional steps needed to remove supports, clean off excess resin, and cure the parts to full hardness. If you're reading this section, I'm assuming you've already completed all of that.
For filament printers, automatically generated supports for overhang areas can usually be peeled off by hand or using a pair of pliers, and then any rough areas can be trimmed or sanded using a sharp x-acto blade, fine grain sandpaper, or precision needle file. Always be careful using sandpaper on PLA prints as the outer wall will typically only be about 1 mm thick, and the heat generated through friction may be enough to partially melt the plastic causing it to stick to the paper or sanding block and peel away from the model. I recommend against using Dremel tools or other motorized sanders for objects printed out of PLA, as they can very easily damage your prints.
In some cases, you may want to apply XTC-3D or another 3D printing coating to try to smooth out ugly layer lines on PLA prints, or use an adjustable temperature soldering iron on a low heat setting to partially melt and reform parts like fingers that came out looking blobby or warped.
For resin prints, UV craft resin or putty can be used to fill divots, cracks, or smooth out other potential print defects.
For both PLA and SLA prints, once you have the parts cleaned up, always try assembling the figure before you paint, just to confirm that all articulation elements fit together and move smoothly. (Note: the exception to this is PLA or flexible resin pop in joints, which you will just have to eyeball as best you can, since once these are locked in place, there’s no getting them out again.)
Wiggle the pieces back and forth across the full range of movement, and if you notice any parts sticking or scraping, sand those bits down with fine grain sandpaper and then make sure you wipe away any excess dust with a damp paper towel. You want all potential part scraping issues resolved before you paint, otherwise you're going to end up having ugly bald patches where all the paint has been scratched off and they will be nearly impossible to fix once the figure is fully assembled. Use a 2mm pin vice hand drill to clean out any articulation holes that call for 1.5mm craft rods so that the rods can be inserted into the holes and snipped off easily.
You especially want to make sure that all rotational hip, shoulder, neck, waist joints that use T-plugs spin freely. These are the most fragile and easily broken parts of the model, and there’s nothing more frustrating that assembling a beautifully painted figure only to have one of the arms get stuck in an awkward posture and then snap off when you try to force it back into proper position.
After test assembly, paint the unassembled parts... allowing them to dry completely before applying the next layer, then assemble and glue in place per the instructions provided. Small gaps can be filled with UV craft resin or putty, and final touch-up paint applied. Once you are satisfied that the figure is exactly how you want it, you can spray the figure with a final protective coat of clear varnish to help protect the paint from scratches and give the figure a uniform matt/satin level of glossiness.

What tools do I need to improve my post-printing experience?
I’ve mentioned several of these items already in the SLA printing section of this FAQ as they are quite useful for removing supports and cleaning out articulation holes prior to curing. However, I recommend that you keep an entirely separate set of tools for that purpose as they will invariably get sticky and disgusting with uncured resin, and you won’t want to use them for anything else.

CHP-170 Micro Wire Cutters - There is no better tool for trimming overlooked support remnants off your prints (which you will always find at least a couple of as you are painting), and they will provide a nice clean cut for the 1.5mm brass craft rods that most of my figures use for articulation.
Pin Vise Hand Drill (with multiple sized bits) – Very useful for cleaning out articulation holes (you'll normally want to use the 2mm size bit for this) and some smaller details (like gun barrels) that often end up partially filled up with resin or PLA during the printing process.
Fine Grain Sandpaper or Sanding Sponge – Another must have for finishing up figures. To sand or not to sand is usually a judgement call depending on whether you think smoothing the surface will result in losing more surface detail than leaving it alone. I like to keep both options around, as there will be times when one can reach areas that the other can’t.
Precision Needle File Set (with multiple shaped tips) – Same as above. It is especially handy to have a few thin rectangular files and various sized round ones. The round files are especially useful for smoothing out the inside of circular holes for rotational T-plug joints as these always end up having some sort of overhang that doesn’t come out perfectly circular.

45° long-nose pliers - These pliers are a lifesaver, especially for PLA filament printing if you need to reach up inside figures to remove internal supports. I'm not sure why the Hakko brand is so insanely expensive in the UK, but ideally you want the kind that has a serrated grip so that you can get a good grip on parts without them slipping out of your grasp. A pair of Locking Forceps will accomplish the same task, but are a little harder on the hands.
Ratchet Bar Clamps - Useful when gluing clamshell pieces together (or you need to clamp somethng down to a table)
Canned Air Duster - Occasionally necessary to propel that one broken chunk of support structure that's rattling around inside a hollow part. Be careful using air duster inside of resin parts as the inside may contrain small pockets of uncured resin that could spatter out, staining your clothing or damaging parts you've already painted.
Adjustable Temperature Soldering Iron (with a needle tip) (For PLA-printed solid parts ONLY) - Can be very useful for removing stray blobs and loops of filament and smoothing out rough areas like the stringy undersides of overhangs or blobby and indistinct fingers on hands. You'll want the narrowest most needle-like tip you can get, and should only operate on the lowest heat setting. PLA melts extremely easily, so it's a balancing act between melting the surface just enough that it gets shiny and smooth, but not so much that you end up slicing through and damaging the print. If the lowest temperature isn't low enough, you may have to switch it on, use it briefly as it heats up and then switch off again and use it as it cools to keep it in the right zone to melt parts. I strongly advise against using a soldering iron on any parts that aren't 100% solid infill, unless you have manually set the outer walls to be extremely thick.

Cordless Rotary Tool (for SLA resin prints only) – Only to be used in moderation for grinding down SLA resin parts, often the rough underside area where the support structures attached. Do not use a Dremel on PLA prints as the heat will melt the plastic and end up ripping away the top layer, ruining your print.
Note: Powdered resin dust is extremely dangerous (it’s basically finely ground glass) and you do not want it anywhere near your eyes or lungs. ALWAYS wear a mask, gloves, and eye protection when grinding down resin, and keep a shop vac handy to immediately vacuum up all dust as soon as you are finished.
Orbital Sander or Benchtop Belt and Disc Sander (for SLA resin prints only) – Useful when you have to print a part at an angle with supports and the underside came out warped or isn’t as smooth as you’d like. As with the Dremel tool, be especially cautious to wear a mask, gloves, and eye protection and vacuum up all dust immediately after you grind parts down. With belt sanders in particular, they often kick up a big plume of dust as soon as you switch them on, so make sure you’re fully protected before you use them. They also tend to grind down unevenly, so be very careful and only apply light pressure while keeping a firm grip on the part, or you could end up with an ugly diagonally ground surface that’s shorter on one side.
Small Wet/Dry Shop Vac – Leave no resin dust or sharpened pointy support structures around to injure yourself on later. I recommend using a separate vacuum from whatever you might use to clean the house, and ideally one that uses disposable cardboard bags. Make sure you’re wearing a mask, gloves, and eye protection whenever you swap bag as this will often kick up a big plume of dust you don’t want to be inhaling under any circumstances.

Daylight LED Craft Light (ideally with built-in magnifying glass) – Will help you see what you’re doing and spot areas of your print that may require sanding/snipping. Having a natural daylight LED will also help make sure your paint selections are accurate.
UV Fast Curing Craft Resin - If you happen to live in the Western United States or Japan near a Daiso store, check there first since they sell UV craft resin in small superglue-sized tubes which are much easier to handle and won't seize up over time. If you live elsewhere in the world, you'll probably need to buy UV resin by the bottle. I recommend going with the smallest sized bottle you can find, since in my experience, if you let it sit on the shelf too long it'll start to set up on its own, even without UV exposure.
Craft resin has many uses in improving the quality of your prints, but it is indespensible for:
-
Sealing up articulation holes whenever you need to use a 1.5mm rod for a knee/elbow/shoulder joint.
-
Filling in unwanted chips, cracks, drainage holes, seams between clamshell parts, or repairing other damaged areas of your prints.While it fuses best to resin prints, it still works fairly well on PLA prints.
-
Creating transparent and light-up parts. Several figures like the Yeti, Mandrel, Toymaker Robot, TARDIS Console and Mk. VII Robotic Cleaner require you to use craft resin to fill in transparent eye or screen parts.
UV Putty - This stuff is currently a bit hard to come by, but well worth tracking down. It's basically just UV resin with the consistency of frosting and usually comes in a tin (specifically for 3D printing) or tube (used for automotive repairs). It's not as transparent as resin, and you can't color it for creating eyes and control panels, but it's thickness and tendency to stay where you put it make is absolutely perfect for filling in holes, covering over seams, rebuilding broken parts, and other minor repair jobs. Just put on a tiny blob and then scrape off the excess and cure with a portable UV flashlight. Note that since it's thicker and more opaque than liquid resin, you can only build up about a mm at a time.
Portable 405nm UV Flashlight - Note: Make sure you get one that says it goes up to 405nm. There are other black light flashlights out there that are okay for checking IDs and pet urine stains but they won't cure resin.
XTC-3D or other print coating (PLA prints only) - As mentioned previously, this is a 2-part epoxy coating that smooths out ugly layer lines on PLA prints. Be warned that these chemical treatments can’t tell the difference between a detail line and a layer line, and will utterly obliterate fine surface details like facial features or tiny control panel circuits. It is much better suited to smoothing out large flat print areas like the SIDRAT, Dalek Time Machine, and body sections of the War Machine and Quark. A steady hand and fine grain sandpaper or a precision needle file is a much better option if you are attempting to smooth down specific areas of your print while leaving others untouched.
What tools do I need to improve my painting experience?
Technically, all you need are a fine brush, good lighting, and a lot of patience, but the items below will help you step up your painting game to the next level

Airbrush Set – Even if you have no experience using an airbrush, and can’t do any of the fancy-pants painting tricks you see professional artists do effortlessly on YouTube, airbrushes are still your best friend when it comes to laying down a thin even base coat on figures that won't obscure fine surface details like spray paint, or show brush strokes/uneven coverage like painting with brushes. If you're serious about creating the best looking figure you can, this is an essential tool to have around.
My personal go-to airbrush is the Master Airbrush G22 System with the G79 "pistol grip" style trigger (which also comes with an optional larger 0.8mm fluid tip set which is better for spraying larger surface areas and slightly thicker paints). I found this version much easier to use and clean than the more traditional top-button G22 style. I recommend watching lots of YouTube videos about your particular style of airbrush to pick up pointers for how to use and maintain them, because they are extremely finnicky devices.
Based on personal experience I recommend paying a little bit more for a professional quality Master brand Airbrush that uses a full sized air compressor, and absolutely do not waste your time on any "portable" systems that use smaller handhelled
cylinders or compressed air cans. They just can't provide the same constant steady air flow which is essential for a nice smooth coat.
Note that airbrushes (and spray paint) will kick up a lot of very fine particulate matter into the air, so you always want to wear a N95 mask or P100 style respirator and eye protection. Whatever you do DO NOT use an airbrush anywhere near your resin printer, computer, TV, or a washer/dryer, as the static charge generated by these devices will suck the particulates straight out of the air like a magnet and leave you with a very messy and potentially device-ruining surprise.
If you must run the airbrush is the same room as your printer, make sure the printer and any ventilation system you have attached are both switched off and the printer cover is on. Make sure all paint fumes have fully dissipated before you switch the printer back on again.
Pop-up Airbrushing Tent or Airbrush Spray Booth – This will help contain some of the paint vapors and you can attach a cheap inline duct fan and a length of dryer tubing to the back of the tent style to vent fumes outdoors. Some of the fancier Spray Booths have built in LED lighting, turntables, and exhaust fans already built in, but they tend to be fairly small so there's only room to airbrush one part at a time. If your go with the cheaper pop-up tent option, also buy a super cheap LED-powered Selfie Ring Light that you can clip or stitch to the top of the tent which will also make it double as a light box so that you can clearly see what you’re working on.
Blue Painter's Tape (various sizes) - Necessary to mask off areas of your print that you do not want to be covered in paint. Be sure to press down extra hard since painter's tape isn't particularly sticky and peels up quite easily. When using an airbrush, try to paint over masked areas from the top down rather than going in from an angle, as the air pressure from the nozzle might be enough to peel up an edge of the line damaging the pattern. I recommend picking up a single hole punch and possibly a few different sized circular craft paper punches, for creating curved and circular masks of varying sizes. I use the standard single hole punch size one quite often to mask off the area around eyes on human figures since these need to be painted very precisely and it's easier if you can preserve the unpainted white resin underneath than having to go back and paint white over the top of an existing darker color.

Box of Powder-Free Exam Gloves – You’ll have these already if you’re SLA printing, but you should also keep a box handy to put on while painting, especially if using an airbrush. Don’t be afraid to go through several pairs as they gradually get dirty. They’re there to keep your hands clean so that you don’t end up leaving paint smears on your model.
Long Handled Tweezers or Locking Forceps – Very useful for holding onto parts while painting. Remember to clean these occasionally with paint thinner so they don’t get encrusted or leave unwanted marks on your parts.
Airbrush Paint Clamps – Likewise, useful for holding onto parts while painting (with or without an airbrish), and even more importantly, to keep them suspended in midair while drying so that they don’t stick to whatever surface you were painting them on.

Gel Super Glue (with precision applicator) - I prefer the Loctite or Gorilla brands myself, but the gel super glue is essential for gluing together clamshell bodies where you need to put down glue in areas that are right up against articulation elements. When using any form of super glue, make sure you are rotating all joints every few moments while waiting for the parts to dry, so they don't accidentally get glued in place.
Liquid Mask - This stuff can be amazing for masking off areas of your figure where you don't want paint to go. It is far more effective than regular blue painter's tape, and a customizer's best friend for creating complex patterns (like checked trousers) but the problem is, it can sometimes be a real pain to get off, especially in recessed areas around eyes and other facial features. I mainly use it for costume details and other parts where (if the worst happens) and I have to try to scrape off the surrounding paint with a razor blade, it won't be the end of the world.
Stainless Steel Paint Agitator Balls - Extremely cheap to buy in packs of 100 or 200. Simply pop one in your paint bottle after opening (they work best when the bottle isn't completely full) and you can give it a good shake like a can of spray paint to mix up the paint before the next time you use it. This will increase the life expentency of your paints, and save wear and tear on your wrists. Note:
Do make sure that you only buy ball bearings made out of stainless steel that say they are designed specifically for paint mixing. If they aren't stainless steel, they will start rusting almost immediately, and ruin your paint.
Mini Vortex Model Paint Shaker - This is an expensive purchase at £100, but if you end up printing and painting long term, it's a very useful bit of kit to have around, because paint pots will eventually separate and solidify, unless you stir them up by hand regularly... which I guarantee you won't. Works best when you combine it with the paint agitator balls above.
You can find cheaper models, but most of them don't come with a clamp to hold the paint bottle in place. These models are typically just a vibrating pad that you can hold the bottle up against yourself. This doesn't stir the paint anywhere near as well, and the repetitive vibrations are quite bad for your carpal tunnel nerves. So if you're going to spend the money, you might as well buy a nice one that's specifically built for model paints.
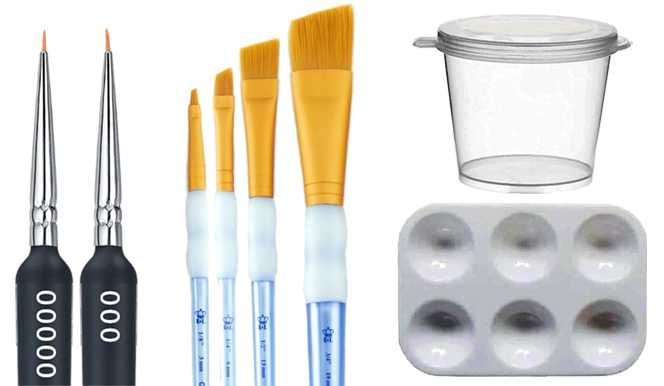
000 and 00000 fine tip brushes - You can usually find what you need in any detail paint brush set that gives numeric sizes, but you will invariably find yourself using the 000 and 00000 size brushes more than anything else, and there are usually only one or two in a pack, so if you end up painting a bunch of figures, it is a good idea to purchase these smaller sizes on their own. The 00000 brush in particular is essential if you're painting humanoid figures and trying to paint eyes/pupils or other extremely fine details.
Smaller sized angular brushes - Another style of brush that can often be found in multi-packs, but the smaller 3mm, 6mm, and 10mm size brushes tend to be more useful overall than the larger ones. Angular brushes of this style are much better at painting crisp straight edges than flat or curved brushes. You will want to buy at least one multipack with some larger sizes though for applying dry brush textures to fur and other larger surface areas.
Cheap plastic sauce containers (with airtight lids) - You are almost always going to need to mix your own paints if you want your figure to look authentic, and you are usually going to need to take more than one pass at it with the same color or a slightly ligher/darker combination for blending. The cheap plastic sauce containers you get from the kebab shop work great for this, and you can buy packs of 100 for only a few £.
Cheap plastic paint mixing palettes - The same ones you used in grade school work fine. Unless you feel like dilligently scrubbing metal ones inbetween uses, just buy a couple of multi-packs and toss them when they get crusty.
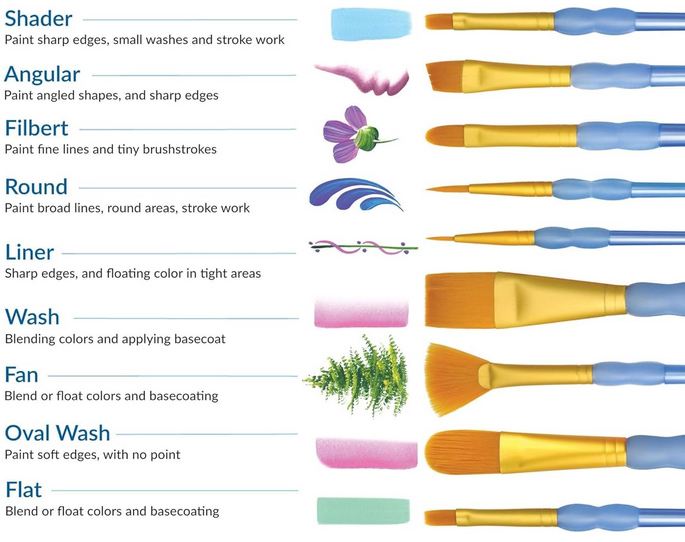
Here's a helpful infographic showing what all the other brush shapes in your paintbrush multi-pack are generally used for. It's useful to have one or two of each around just in case you need them, but since most of the painting you'll be doing is fine detail oriented, the brushes designed for broad strokes and soft edges will be less useful to you than the ones designed for pinpoint and crisp flat edges.
.
Should I paint with Acrylic or Enamel paint?
Every customizer has their own personal preference, so my diplomatic answer is "whatever works for you."
However, before you spend a small fortune buying model paint, you should probably settle one or the other, because water-based acrylic and oil-based enamel mix together about as well as.... well... oil and water, and will actively repel eachother. (Though you can sometimes use this to your advantage, which I'll discuss later.) This can be especially annoying if you regularly use brands like Testors who sell both styles of paint in identically shaped bottles which are easily mixed up.

Acrylic paint is water-based and non-toxic, which means it dries faster and is easier to clean up but it is also less durable and (in my opinion) doesn't go on as smoothly or look as nice because it has a tendency to show brush strokes and the colors lose their luster as the paint dries. On the plus side, you can walk into any comic book store that sells gaming miniatures and choose from hundreds of different tiny bottles of pre-mixed Vallejo or Citadel model paint in every color of the rainbow (and several dozen shades of brown and flesh tone). Because it's more popular among the hobby community, there tends to be a better selection in stores and it typically costs about half as much per fl oz.
Enamel paint is oil-based and the fumes (just like most enamel spray paints or nail varnishes) are toxic enough that you should always wear a mask or paint in a well ventilated area.
Enamel dries much slower than acrylic paints so you typically have to wait several hours between coats, but that also makes it easier to blend colors and create more natural looking color transitions. This also means that it's easier for colors to bleed through from previously painted layers, so you do need to be conscientious about painting lighter colors over the tops of darker ones. Enamel is much more durable and less prone to cracking with part movement, but it also requires you to use paint thinner or turpentine for clean-up and is worse for the environment. (Don't wash your enamel paint pots out in the sink!) It goes on a bit glossier than acrylic, but it generally looks the same when it's dry as when it's wet so there are fewer color surprises. Note that you can easily counteract the glossiness of enamel by applying a protective layer of matt or satin acrylic varnish or dullcote lacquer to your figure after you've finished painting it. You can gloss acrylic up, but it'll always come out looking slightly muted.
In my personal experience, enamel will give you superior results if you're willing to take your time and paint your figures slow and steady over the course of a couple of days. But acrylic is faster, cheaper, and easier to use overall, so they both have their benefits. I primarily use enamel based paints, so most of the examples I give below will be for them, rather than acrylic.
What brands of paint do you recommend?
Over the last seven years I've developed my own painting routine that
works well for me, but I'm sure somebody out there who has spent twice as long painting Warhammer miniatures has an entirely different opinion on what you should be using.
That said, here are some brands of paint that I've had reasonable success with for different functions. None of these are paid endorsements, but if Spaz-Stix or Testors happens to stumble across this page and wants to offer me a corporate sponsorship and a lifetime supply of free paint, I certainly wouldn't say no.
Spaz-Stix Airbrush Paint

My go-to paint for just about everything is Spaz-Stix Airbrush Paint, which is easily obtained in the US and Australia, but apparently not so much in the UK. Which is a real shame, because the stuff is absolutely amazing, and ticks pretty much every box you could hope for in a model paint:
 |
It's a pre-thinned liquid that will always be the perfect consistency, so you can just paint it on with a brush or pour it directly into your airbrush without needing to thin it out first. This eliminates one of the biggest headaches of painting with enamel because if you've ever tried thinning regular enamel paint yourself, the mixture invariably turns out too thin where it goes on semi transparent or starts blending with the layer you previously painted below, or too thick to where it comes out lumpy and clogs up fine surface detail as well as your airbrush.
|
|
Because it's already pre-thinned to the perfect viscosity, it is absolutely perfect for mixing custom colors;
either with other Spaz-Stix liquid paints or more traditional enamel brands. You can pour a ton of Testors into this stuff before you'll ever need to add in thinner. But I strongly advise you to just go ahead and purchasing the full range of solid primary colors because with a little practice, you can use them to create nearly every color you could possibly want, and it's way easier to mix two liquids pigments together than two solids, since you can literally add them together a drop at a time until the color balance is absolutely perfect.
|
|
It it specially formulated to stick to almost all forms of resin and plastic (no primer required), and it won't crack or flake off when painted on flexible parts.
|
|
If you're airbrushing, it dries into a microscopically thin layer that won't clog up fine surface details like spray paint. Used correctly, your figures will look immaculate. This effect is reduced slightly if you're painting it on by hand, but even with a brush, it still goes on quite clean and smooth.
|
|
The colors are incredibly vivid and don't fade. As long as you didn't miss a spot, one pass is usually all you need for complete coverage.
|
|
By volume, it's cheaper than almost any other enamel model paint you can buy. (Though it is pre-thinned, so part of what you're paying for is the thinner.) |
| |
|
 |
It calls itself an "acrylic enamel", but for the purposes of mixing, it only blends with other enamels.
|
|
Color selection is extremely limited. Most of what's on offer is weird holographic or metallic colors that are great for RC cars, but less useful for our purposes.
You can buy most of the primary colors, which can easily be blended with black or white to create lighter or darker variants, but there is no brown or flesh tone.
If you want brown, you'll have to mix orange and green with a little bit of black or white. Flesh tone is much harder to mix correctly, so you may want to simply go with Testors colors on that one, but you can theoretically get there by mixing white with very small amounts of pink and orange.
Never throw your empty Spaz-Stix bottles away because you will end up using most of them to store your own custom mixed colors.
|
|
Like most enamels, it take a long time to dry, and it will look deceptively done before it really is. Resist the urge to pick up parts and handle them in this state because the paint can easily rub off and stick to your fingers or gloves.
|
|
It's liquid enamel so it has a very strong spray paint/nail polish odor. So you should absolutely wear a mask or make sure you are painting in a well ventilated area.
|
|
The bottles are tall and thin, so they are quite easy to accidentally knock over. Knocking over a full bottle is just as disastrous for your furniture, floor, and clothes as you'd expect.
|
|
Remember to shake the bottles well before you use them, and if you have bottles sitting on the shelf, shake them thoroughly ever couple of months, otherwise the pigment will solidify into an unusable lump at the bottom. (This is a problem for ALL enamel paints, but because of the bottle design it can be a bit harder to spot separation occuring until it's already happened, and you attempt to airbrush with it only to discover that it's mostly thinner.)
|

I do want to call special attention to the Spaz-Stix Ultimate Black Backer (sometimes sold as high gloss backer, I think it's the exact same product) and Ultimate Mirror Chrome. Simply put, this is the best silver model paint you can buy, but if you actually want a mirror chrome finish, it takes a bit of additional work.
If you spray Ultimate Mirror Chrome directly onto a standard SLA or PLA surface without the backer, you'll get a pretty nice silver paint job that looks a bit like brushed steel or aluminum.
For PLA, this is usually as far as you can get, since the black backer really only works on flat smooth surfaces. If you're willing to use XTC-3D or a lot of sanding and varnishing to give youself something approximating a smooth resin-like surface, you can proceed to the next step.
For SLA (or smoothed PLA),
if you really want a proper reflective chrome surface (for something like the Raston Warrior Robot head or a Silver Nemesis Cyberman helmet) you need to spray down the Ultimate Black Backer, and then usually spray down a second coat once the first has dried so that you have a nice glossy black surface that reflects light. If it isn't black and glossy enough, you may need to spray a thin layer of clear high gloss varninsh on over the top of that.
Once you have a "just waxed" polished floor style reflective surface going on, airbrush on a thin even layer of Ultimate Mirror Chrome. Don't overdo it, because you don't want to create uneven surfaces. Be very careful not to touch the part while it's drying. If you must touch it at any point, make sure you are useing clean tweezers or forceps. Ideally, allow it to sit and dry for at least 24 hours.
This should give you the desired mirror chrome effect, but to preserve the shinyness, you're going to need to spray the part with a clear high gloss resin and then polish it like you would any other chrome part.
Testor's/Revell/Humbrol Enamel Paints

I primarily use Testors Enamel as a secondary mixing color or alternate to Spaz-Stix airbrush paint in those situations where it would be a real pain to try to recreate the color I need from Spaz-Stix's collection of primary colors. (Mostly flesh tones, browns, and dark greens) Revell and Humbrol are very similar in terms of quality and give you twice the volume of paint as a standard 7.4ml bottle of Testors.They also have pry-open lids that are the same color as the paint, which makes organizing your bottles a little easier.
Personally, I always try to buy the larger Testors Model Master bottles when I can, as they hold twice the volume of a standard bottle and are much easier to open and close.
Here are a few colors combinations I use quite frequently:

Cream, Light Tan, Dark Tan, and Light Ivory (which I beleive now goes by Desert Tan) are the four colors I usually use to mix caucasian flesh tone. I mostly use Cream as base and then mix in very small amounts of the other three to create light and dark complexion areas.

Rust, Jet Exhaust, and Brass are great for creating metallic parts. Mixing these three in different combinations will give you a wide variety of very realistic looking metallic colors.
Rust isn't particularly metallic looking on it's own, but it's a very nice reddish brown color suitable for fur and leather, especially when mixed with other browns. If you want to create something truly rusty looking, mix it with Jet Exhaust, which is a glorious grimy oiled steel color. Jet exhaust in particular is a great add to any part that is supposed to look like unfinished or greasy metal. Brass looks more like actual gold than gold paint does, but you can mix it with Rust or Jet Exhaust to create more coppery or bronze-y tones.
Testor's Enamel Paint Pens

If you own a resin printer, it is very handy to have a White and Black paint pen around for filling in recessed lettering.
This trick only works on resin prints because we're dealing with ultra fine surface details less than
1mm deep, but it is the only way you're going to create the functional destination dials on the TV Movie TARDIS or CET Machine. Basically, what you need to do is print the part entirely out of black resin (or whatever base color it needs to be) then quickly paint over the top of the letters with the paint pen and then immediately swoop in with an alcohol wipe to clean off the surface of the object, which will only leave the lettering behind.
Krylon Triple Thick Clear Glaze

This is another one that's only for SLA resin printing. If your want to turn your clear parts as clear as glass, buy a can of
Krylon Triple Thick Clear Glaze. This stuff is absolutely amazing, and will not only clear up foggy prints, it'll also fill in minor scratches and imperfections. Be warned that it will also fill in fine surface details too, and pool in any recessed spaces, so you have to be careful not to get too overzealous when using it.
Vallejo Matt and Satin Acrylic Varnish or Testors Glosscote and Dullcote Lacquers

One of the secret tricks of painting with enamel is to use an acrylic varnish to seal it and give it a less glossy surface shine. You do want to wait until the enamel is completely dry to do this, but because acrylic is water based, it won't cause your carefully applied enamel paint job to run.
I generally use a 50/50% mix of Vallejo Matt and Satin Acrylic Varnish to create a surface shine that's very close to what you get from a Character Options figure.
Ideally, for most figures you want it just shiny enough that you can see the faintest hint of light reflection under very bright lighting conditions. If the figure is meant to be metallic or shiny, I'll use 100% Satin varnish. If it's meant to be very dull and non-reflective, I'll normally use about 75% Matt to 25% Satin, because a completely matt surface tends to dull the colors and make them less interesting.
If you are painting with acrylic paints, you're typically going to have the opposite problem, where your paint jobs looks flat and boring. If you want to brighten
them up a bit, you'll need to mix up a combination of Glosscote and Dullcote Lacquer (unfortunately they do not make a Satin) until you get a clear protective layer that's midway between the two.
What other painting and assembly tips do you have?
- Use hot glue or caulk to hold LED elements in place if you want to be able to change the batteries later on. It isn't possible to do this on all designs, especially on some of the smaller figures that use LED Lego bricks that must be held in place by transparent resin, but most LEDs use watch batteries which will slowly lose their charge over about a year, even if you don't turn them on. At a certain point the light up feature will just stop working and it'll be easier to replace the batteries if the material holding the battery pack in place is something that can be cut away and replaced with tweezers and an xacto blade.
- Built up your colors carefully and (in general) try to paint lighter colored parts first. It's always easier to paint a darker shade over a lighter one without the previous color bleeding through.
- Paint from one end of a part up to where you're holding it, and don't be afraid to come back to finish it up later. In other words: slow and steady wins the race, and you're more likely to ruin your carefully painted figure by trying to hold it at a weird angle using tweezers or on an area you've already painted that isn't fully dry. You're much better off setting it down half-painted and moving on to another piece or fixing yourself a snack, while the first area dries. Most acrylic and enamel paint will be perfectly fine for at least 12 hours if you pour it into a small airtight spill-proof container like the one your oil or dipping sauce comes in from most restaurants.
- Alternate between acrylic and enamel paints to prevent bleed-through on complex designs. This will cost you a little bit more, since it means purchasing a paint that can't be mixed with the style you normally used, but if you are trying to paint something complex and fiddly like say... a plaid jumper or striped pair of trousers with lots of overlapping lines, painting one color in acrylic and one in enamel (usually whichever color needs to be brighter) will make your paint job that much more professional looking. Be warned however that having both acrylic and enamel paint visible on the surface of a figure may cause problems when the time comes to apply a clear finishing varnish, as the acrylic or enamel that matches your varnish may bleed, unless you specifically apply a thin layer of the opposite style varnish over the top of that area first.
- Mix your own paints and shake them regularly. Model paints aren't cheap, and it's always frustrating to go back to that nearly full bottle of Robin's Egg Blue that you used 6 months ago, only to find that it has seized up into an unusuable lump. Buying mostly primary colors and mixing them yourself ensures that all your paints get used and shaken more often. And whenever you open a paint bottle, it is helpful to drop in a stainless steel paint agitator ball that will allow you to shake it up like a can of spray paint and give it a really thorough mixing at least once every couple of months.
|