Figures and play sets in scale with the existing 5.5" Character Options range of figures that I have personally remixed to be fully articulated and/or add other improvements.
REMIX001 - Battle Damage Emperor Dalek
Original design by Edward Felix
Remixed by Troy Ryan Wood
Version 3 - Updated 1/16/2021
Final: https://drive.google.com/file/d/1_swhbjRDHv3TzoksyxxtzYThxmMEVuMo
Notes: This was my first remix, and mainly a superficial one. The outside is almost entirely Edward Felix's original design, I just pimped it out by adding
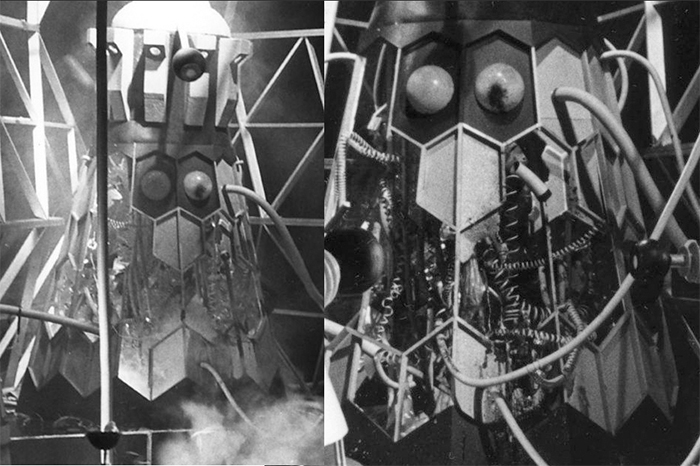
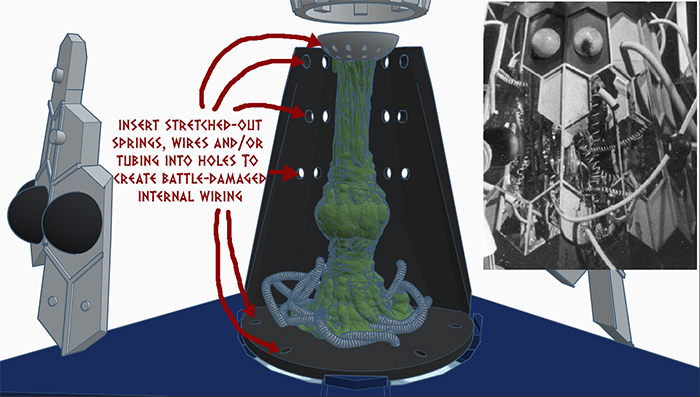
a movable eyestalk, alignment pegs, Flashing LED string light support, the large triangular plinth and two removable front panels and an exposed central core that will let you transform the figure into the burnt out "dead" version with exposed wiring as
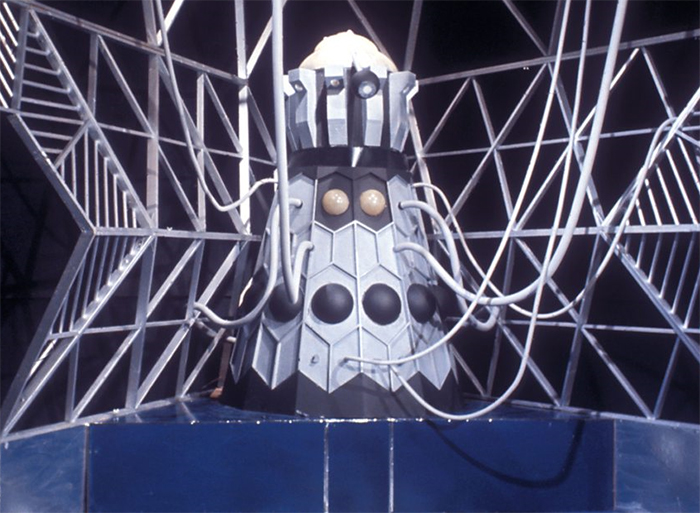
seen in the climactic battle at the end of episode 7. (Even though this episode is missing and all we have are some behind-the-scenes videos shot with a handheld camera)
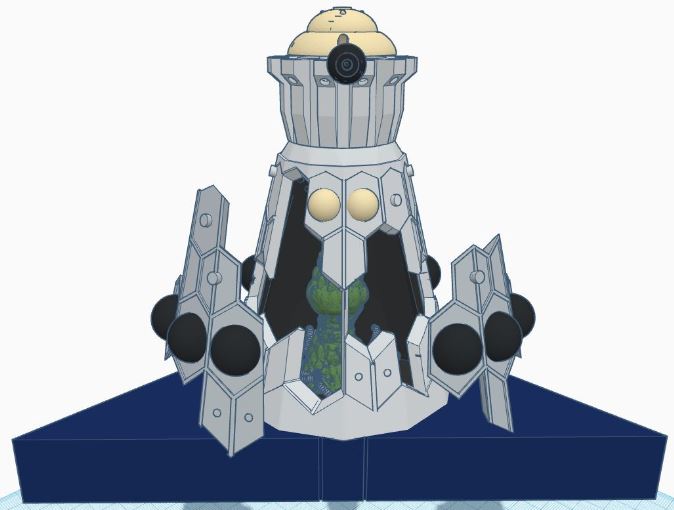
Print Recommendations: This figure has multiple alternate file options depending on what features you want to add to your Emperor. Note that while there *is* a SLA resin version, the Emperor is far too big to print on a regular-sized resin printer like the Anycubic Photon or Elegoo Mars. You'd need to print the skirt on a regular filament printer or one of the expensive large scale resin printers if you want it to come out successfully.
For PLA filament printing, I recommend printing at 80 to 100% infill if you're planning on adding LEDs so it doesn't glow through the plastic too badly. You can drop down to a lower infill amount for most pieces if you won't be using lights. The eyestalk should be printed at 100% fill for maximum durability. (You may want to print a spare just incase the first one snaps.)
All versions of the figure use the same Head and Dome parts. There are two versions of the Eyestalk depending on whether you are printing in PLA or SLA resin (on a resin printer you have the option of inserting a tiny LED into the eye itself!).
There are two versions of the triangular Corner Plinth (which is entirely optional.)
There's a Solid version that can only be printed of very large printers, and a Split version, that is split into three parts, if it makes it easier to print.
Battle Damage Skirt (No Hemis) - Use this version if you are printing the Battle Damage version on a PLA filament printer.
You will need to print the Left Damage Panel No Hemis, Right Damage Panel No Hemis, Black Hemis and Black Button Hemi files to go with this version. The hemispheres (or dalek bumps) are separate so you can print them flat without overhangs. You only need to print the Black Button Internal for LED file if you intend to mount Flashing LED string lights (this should be the type that has a button.) If you do not, you still need to print the separate Black Button Hemi to cover the hole. It is recommended that you print the Internal Battle Damage Core with this version as it provides support for hoses and wires, but is not essential if you want to completely build the inside from scratch.
Battle Damage Skirt (With Hemis) - Use this version if you are printing the Battle Damage version on a large sized resin printer or are using one of those fancy dual-extruder filament printers that lets you print disolvable supports so you don't have to worry about ugly overhangs.
You will need to print the Left Damage Panel With Hemis, Right Damage Panel With Hemis, and the Black Button Hemi files to go with this version. You only need to print the Black Button Internal for LED file if you intend to mount Flashing LED string lights (this should be the type that has a button.) If you do not, you still need to print the separate Black Button Hemi to cover the hole. It is recommended that you print the Internal Battle Damage Core with this version as it provides support for hoses and wires, but is not essential if you want to completely build the inside from scratch.
Solid Skirt (No Hemis) - Use this version of the skirt if you want a regular undamaged Emperor. You do not need to print the Internal Battle Damage Core or any of the Damage Panels. You will still need to print and glue on the Black Hemis and Black Button Hemi for this version, even if you do not intend to mount LED lights.
Color Recommendations: The exterior is pretty simple since we have good reference photos. The upper dome and upper two chest hemispheres should be a yellowed cream color, approximately the same color as unpainted fiberglass resin. (Fun fact... the head of the Emperor Dalek is actually a Chumbley recycled from Galaxy 4!)
The majority of the head and body is light grey (Testors "Light Ghost Grey" seems to be a pretty close match) however, the interior of the lights encircling the head are white, and the slats between the "crown" parts of the head are painted the same black as the body hemispheres, "candy apple" part of the eyestalk, collar, and "bib" behind the upper two hemispheres. The end of the eyestalk is grey with a white iris.
If you intend to hook hoses to the outside of your model, you'll want to look for some 4mm OD/2mm ID white silicon tubing.
If you want to be extra accurate, paint or sharpie the last mm or so of the tube black where it connects to the pegs on the body.
The plinth is dark blue, with silver trim around the edges.
The interior is another matter. I recommend painting the Internal battle damage core and most of the Emperor Dalek interior black to start with. The mutant core should be green. The curled "telephone" hoses are easiest to replicate by getting a few different thicknesses of wire, and just wrapping them around different cylindrical objects like pencils, painpaintbrush handles, and the 1.5mm rod used for securing the eyestalk. It looks like they were a wide variety of colors, so just use whatever's handy. You may want to give the core a light spraydown with dilluted black airbrush paint before final assembly to blacken and stain everything a bit so that it looks like it's been on fire.
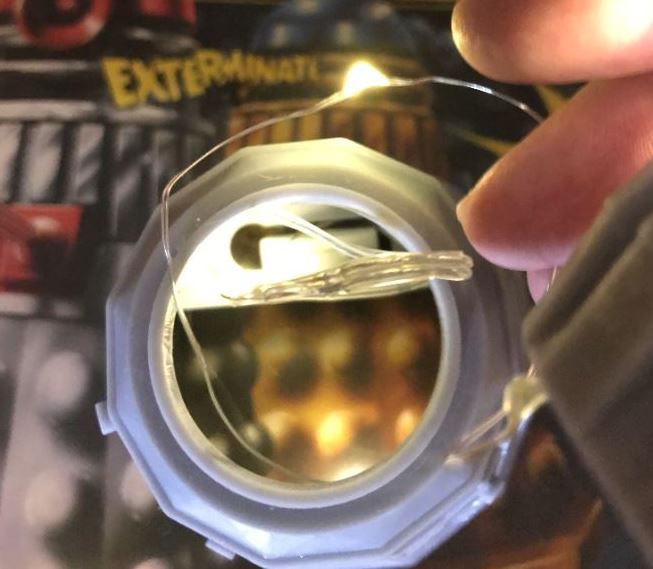
Assembly Instructions: If you are using the optional LED string lights, the first thing you need to do before assembling anything else is push the Black Button Internal for LED (the little peg part) through the square hole on the inside of the emperor so the round end sticks out through the back. This is what you'll be gluing the Black Button Hemi to eventually, but once you've got the button through the hole, hold the skirt so the button is lying flat, and you can slide your LED string light into position from the slot near the neck section, you'll need to slide it down so that the LED string comes up through the same hole on the left side (which has a slight circular hole cut into it) Everything should line up in such a way that the peg you inserted earlier lines up with the button on the LED battery pack, and pushing it from the outside will turn the lights on and off.
If you want to be able to change the batteries later, I recommend that you do not glue the battery pack in place, or only use hot glue that is easy to remove later.
The rest of assembly is easy. The head and dome only go on one way. (If you want to leave the battery pack accessible You should either not glue the head, or glue it with hot glue or something you can pry loose later.
If you're using LEDs, Insert the LED string lights into the light holes around the edge of the crown. These will need to be sealed in place. You can use crazy glue, but I prefer using UV craft resin. The lights will alternately blink when you turn them on with the button. This is screen accurate from what we can tell from a few surviving behind the scenes clips.
If you printed in resin and intend to mount a LED in the eyestalk, you will need to clip off the very end of the LED string (leave at least a couple of centimeters of wire after the next light) then burn the ends where you cut the wire with a lighter. There's an incredibly thin insulation coating you need to strip away. Once that's done, insert the lone LED into the eyestalk hole and feed the wire through the tiny hole into the head. Use electrical
tape to very carefully reattach the wires. This is easiest done with the lights turned on, so you can make sure you're getting a clean contact. The voltage on these lights is so low, you don't have to worry about getting a shock.
Once you've got LEDs in place (if you're using them) mount the eyestalk in place with a length of 1.5mm wide brass rod trimmed to the right length, or failing that, a toothpick or bit of coat hanger.
The internal Battle Damage Core has several holes where you can mount springs, wires, or bits of extra tubing. I originally intended to use springs for my design, but found that simply wrapping lenths of different gauge wire around the 1.5mm brass rod, an old screwdriver, and a few different sizes of paintbrush handle gave me a nice assortment of curly tubes to add to the center. I recommend gluing the Battle Damage Core in place to the back wall once you have everything set up the way you want it. there should be no reason to remove it from the figure once it's in place since it doesn't interfere with the LED pack.
|
 |
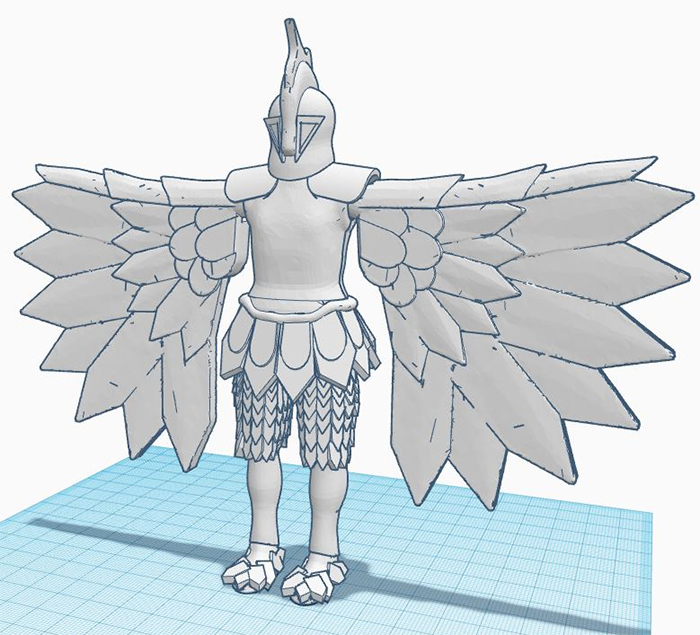
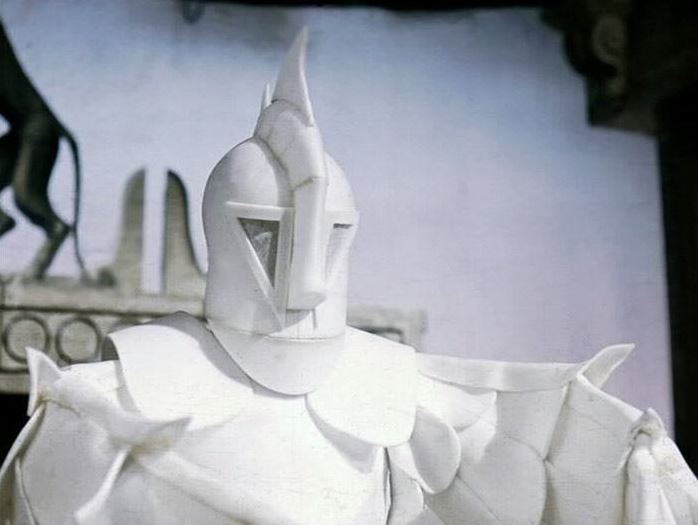
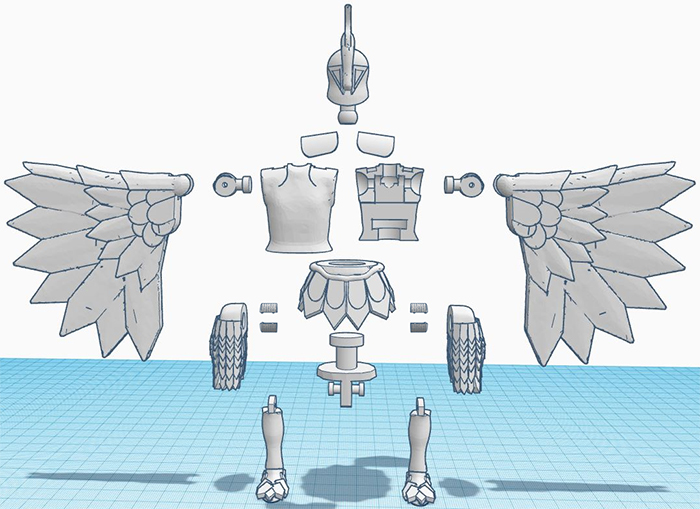
REMIX002 - Kronos (Chronovore)
Original design by James Lee
Remixed by Troy Ryan Wood
Version 2 - Updated 11/16/2020
Final: https://drive.google.com/file/d/1n1HSEg9pMhIpdJ7vM7rc62N9hprBneo2
Notes: This is the first of many amazing figures designed by James Lee that I'll be adding articulation and minor tweaks/detail upgrades to. He's cranking these things out 6x faster than I can work on them, so check out all his other incredible creations and know I'll try to get to as many of them as I can, but I still have my own figures to work on as well!
Print Recommendations: The files used to print this figure are the same, regardless of whether you are printing in
PLA (filament) or SLA (Resin) unless specifically noted. This figure should be printable in PLA (James original was) but the shoulder pads are very thin and may require additional support. I have included two alternate versions of the wings; a solid version for PLA and a SLA version that has a separation between the front and back edges of the wings.
Color Recommendations: This is one figure you can get away with not painting at all if you printed him in white to begin with.
If you want to add an extra bit of detail, the eye screens in the mask should be a dirty grey, and there's some slight discoloration around the edges of the crest. Otherwise, he's all white.
Assembly Instructions: Begin by attaching the wings to the shoulder pivots with 1.5mm wide brass rod trimmed to just a couple of mm shorter than the depth of the hole. I prefer the brass rods for my design because they're incredibly sturdy while still easy to cut, but you can always use
a toothpick or bit of coat hanger if you want.
Once the rod is all the way through the shoulder pivot, seal the open end with UV craft resin, craft putty, or crazy glue gel. Then do the same to attach the legs to the thighs (make sure you have the feet pointing the correct direction before you seal it in place! The legs should bend backwards but not forwards)
Next, take the hip sheaths (the small half cylinders) and clamshell them around the hip joints on the crotch. they should spin freely. If not, you may need to file them a bit. Usually, you don't need to glue the hip sheaths together themselves, just put some crazy glue into the thighs, and slide the hip sheaths into place.
Stick the leg assembly up through the central hole in the skirt, and clamshell the torso around the other end, as well as the two wings and the head. Make sure all the pieces fit together and move correctly before you crazy-glue the torso shut. If the hips are loose, you may need to glue the top part of the skirt to the underside of the torso.
Finally, add the shoulder pads, and you have an fully assembled Chronovore.
|
 |
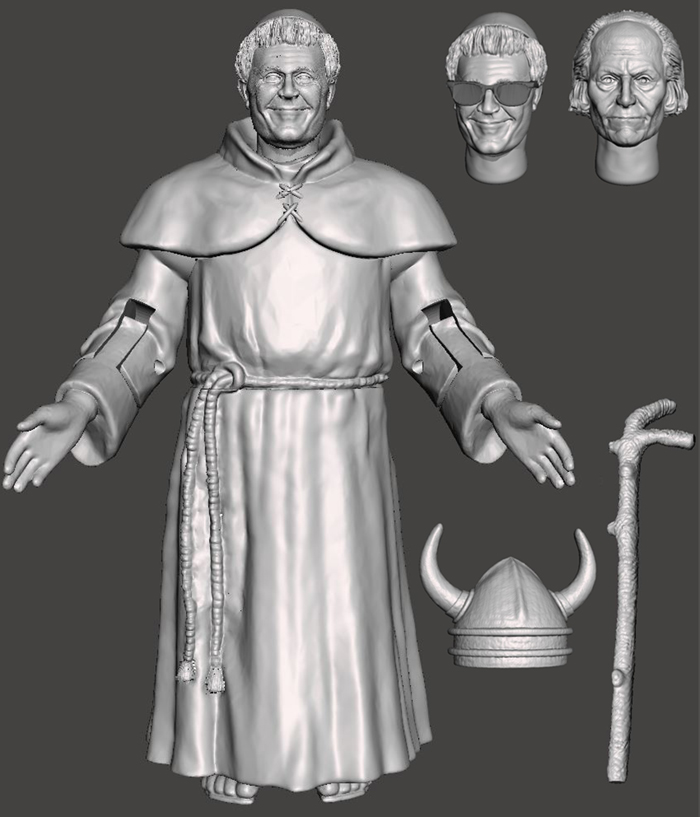
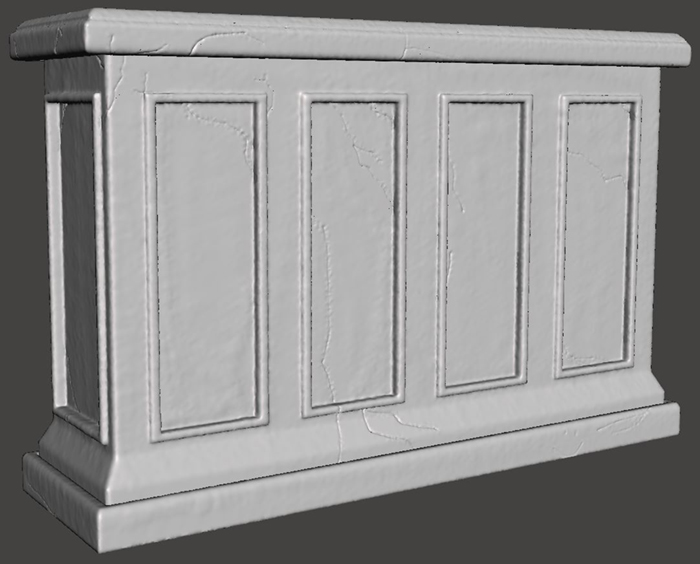
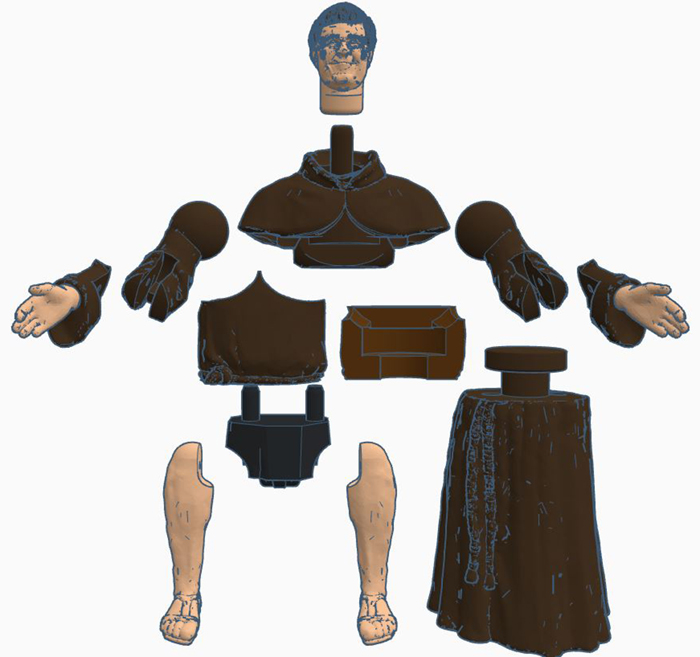
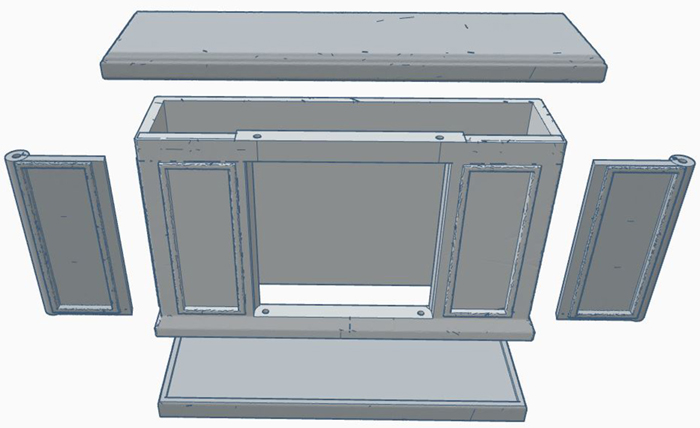
REMIX003 - The Meddling Monk and TARDIS
Original Monk head sculpt by David Turner, Monk's TARDIS by Jeffrey Fink
Remixed by Troy Ryan Wood
Version 2 - Updated 2/12/2022
Final: https://drive.google.com/file/d/1rSz_tEKqhWtzPFLzFtQ0q_NKMvmhwC2Q/
Notes: This figure came about because David shared his amazing 1:6 scale Peter Butterworth head sculpt with the group, and I already had a fairly screen accurate monk's robed sourced that I hadn't done anything with. Jeffrey also kindly provided the Monk's TARDIS to complete the set. Special thanks to the "Scan the World" project, and Saint Anthony of Pauda... whoever you were, for providing the original robe. You can find David's original 1:6 scale head, as well as several of his other designs below in the "Other Scale" section.
Print Recommendations: The files used to print this figure are the same, regardless of whether you are printing in
PLA (filament) or SLA (Resin). The Monk should be printable in PLA, but SLA resin is highly recommended, at least for the head(s) to maximize facial detail. When SLA printing, always angle the head approximately 45° so that the face is pointing up away from the build plate. I recommend using a flexible resin like 3DMaterials SuperFlex or SirayaTech Tenacious as an additive, at least for the hands and accessories to prevent accidental snapping.
The Monk's TARDIS is primarily designed for PLA filament printing, as is too large to fit on most entry-level resin printers, even if you rotate the design. If you do resin print, you will likely have to plane cut the Top, Middle, and Base into two halves so that they will fit in your build area. Make certain that you clean out the hinge holes thoroughly before you cure the doors, otherwise they may dry solid and you will have to attempt to drill them out.
This zip files includes three subfolders for The Meddling Monk, The Monk's TARDIS, and Optional Accessories. Optional accessories are not necessary to print the main figure but
are available if you want to print:
- Alternate quick-swap Monk's head with sunglasses as seen in The Daleks' Master Plan.
- Alternate quick-swap 1st Doctor head to create the disguised Doctor from Episode 4, or the Abbot of Amboise from The Massacre. (Since no telesnaps exist for that story, and we have no idea what the 1st Doctor's doppelgänger costume actually looked like)
- The stick used as a pretend rifle by the 1st Doctor to threaten the Monk.
- A space helmet for a cow
- and a pair of sunglasses (separate) for the Monk to wear. Note this is very small and very fragile and you will need to mix in at least 50% flexible resin as an additive if you are printing out of SLA resin so that it will bend rather than break.
The Monk's TARDIS has an optional printable insert if you want to add a sticker or cardstock to the back interior wall showing the shrunken console room interior. This should ideally be
printed at 600 DPI (standard DPI for laser printers), and measures 147mm wide by 93mm tall (the same dimensions as the back wall).
Color Recommendations: Before painting, make sure you test assemble all parts without glue to make sure they fit and move correctly, and any parts that are too tight get sanded down.
We do not have color reference photos for the monk's costume, but the robe appears to be an extremely dark brown, and his skullcap looks to be roughly the same color. His belt would have a been a light sisal-colored tan. While we don't get a good look at his sandals they were likely leather and a similar color to his robe. His feet and legs would have been bare.
Peter Butterworth's hair looks much darker during television appearances in the 1970's, but he often sported a much lighter chestnut color during the 1960's, as can be seen in the Carry On films. Given that his hair appears so much lighter than the skull cap and hood durring The Time Meddler, I believe his hair was probably fairly close to the color shown in the example photos below.

Likewise, we don't have color references for the Monk's TARDIS, but it should be a light grey stone color. The center of the rectangular panels tend to be slightly lighter than the rest of the altar, with the cracks and corners are darker. The inside should be painted flat black, except for the rear wall if you are going to be printing the shrunken TARDIS interior sticker.

Assembly Instructions: After painting, begin by assembling the elbow and leg joints using 1.5mm wide brass rod trimmed to just a couple of mm shorter than the depth of the hole. I prefer the brass rods for my design because they're incredibly sturdy while still easy to cut, but you can always use
a toothpick or bit of coat hanger if you want.
Once the rod is all the way through the elbow pivot, seal the open end with UV craft resin, craft putty, or crazy glue gel. You can do the same with the legs, but this is not strictly necessary, as once you insert them up inside the robe, they will be locked in place and cannot fall out.
Next, flip the lower half of the robe upside down and insert the legs/crotch so that the pegs slot into the peg holes. When assembled correctly, you should just barely be able to see his toes past the bottom of the robe. Note that if you printed the skirt with internal supportsyou may need to sand or file down the inside to make sure that the crotch can travel all the way down and sit flush without getting caught on anything.
Next, pop the ball joints of the arms into the shoulder holes of the upper hood.
It may be a tight fit, and if they won't pop in on the first try, you may need to sand down either the ball joint ot the edges of the shoulder holes.
Finally, glue the front and back chest around the T plug of the lower robe like a clam shell so that the waist moves freely inside.
Once this is dry. glue the upper torso to the lower, making sure that the arms still move freely in their sockets.
For the Monk's TARDIS, first stick the shrunken TARDIS interior image to the inner back wall of the model if you plan on using one. Make sure you know which direction is up. (The tapered corners should be down at the bottom)
Next,
glue the center section down to the base, then insert the two doors, and drop 1.5mm wide brass rods down from above to act as internal hinges, trimming the rods to be 1mm shorter than the upper edge of the hole. (The rods need to go all the way through into the base. Make sure you test both doors to make sure the rod has gone all the way down locking it in place, and both doors swing freely without coming loose.
Then glue down the top of the model, sealing the internal hinges from both ends.
|
|
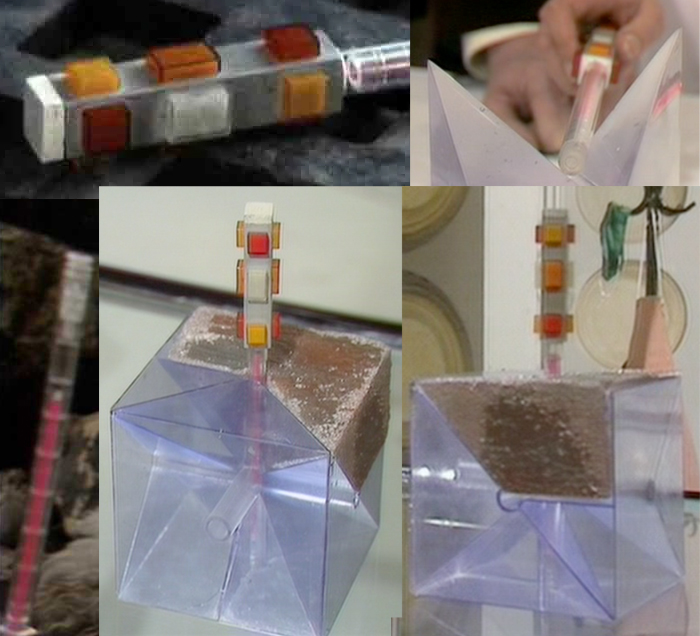
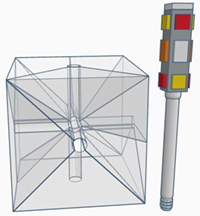
REMIX004 - Key To Time and Tracer
Original design by Dan Liwszyc
Remixed by Troy Ryan Wood
Version 1 - Updated 2/13/2022
Final: https://drive.google.com/file/d/1NeMleGUeU0GqZFJ0z7UdTbmD0dFj0J4j
Notes: A quick and easy remix of Dan's 1:1 scale version you can find down in the props section, with the addition of a tracer to complete the set.
Print Recommendations: You're going to want to print the key out of clear SLA resin if you can. You can try printing out of transparent PLA or PETG, but it will not be perfectly clear like the original prop.
If you don't have a resin
printer, you can always try printing the pieces out of normal PLA, then pressing them down into clay or
plaster to create an inverse mold (make sure the widest flat side is on the top) and then filling
the hole with clear epoxy craft resin.
There are two versions of the tracer: Tracer for SLA and Tracer For Flat PLA Printing.
The SLA version has buttons on all four sides of the handle, but because the round section is only 2mm wide, it will likely snap if it is not printed out of a special flexible
resin like 3DMaterials SuperFlex or SirayaTech Tenacious.
The flat version
is designed to be printed flat on the build plate using PLA or PETG. This only has buttons on 3 sides and the tracer rod will need
to be rounded off on the bottom edge.
This set also includes an optional extra Segment 6 stand-in, which is the fabricated version of the 6th segment as seen in The Armageddon Factor with a bumpier texture suspiciously like styrofoam.
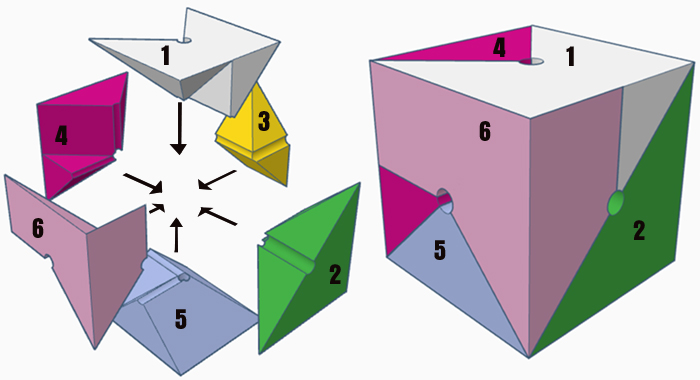
Color Recommendations: There were multiple versions of the Key To Time featured during season 16, including the original cast lucite segments used during the first five stories, and a hollow version used to replicate the assembled cube for the final story. The cube segments should be clear resin color.
The tracer has a clear rod with a red insert that sticks out about 3/5 of the way up from the handle. This was to small to replicate accurately at CO scale, so you might have to settle for painting this part of the tracer pink. The handle of the tracer is a light grey, similar to the color of the TARDIS walls, and both ends are white. The button colors alternate in the following pattern:
Base:
Yellow/Red/Yellow/Red
Middle: Orange/White/Orange/White
Upper: Red/Yellow/Red/Yellow (the opposite of the base row)
The stand-in segment piece is a whitish silver, the color of a painted piece of styrofoam.
Assembly: There is no assembly necessary for this figure. But if you are having trouble figuring out how the 6 pieces of the Key to Time slot together....
|
 |
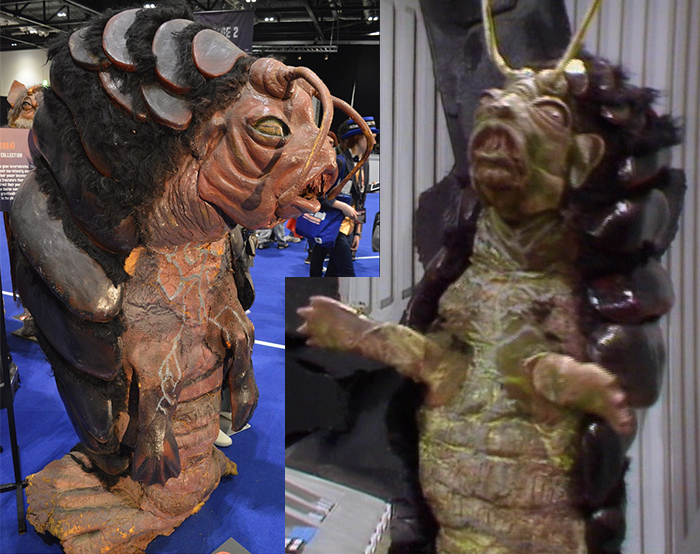
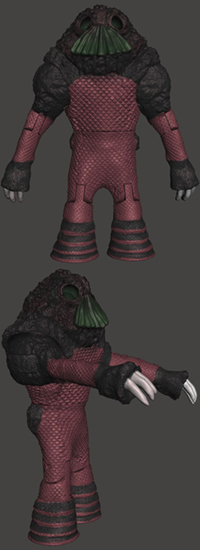
REMIX005 - Tractator and Gravis
Adapted from the Eaglemoss Gravis figurine (no longer available)
Original Gravis design by unknown
3D Scanned by John DiMaggio
Remixed by Troy Ryan Wood
Version 2 - Updated 1/15/2023
Final: https://drive.google.com/file/d/1HR33sLnapVWQ77PWzqyPNFSMsGoQWrA_/
Notes: This was our project's first successful attempt at using a 3D scanner to reproduce an existing Eaglemoss figurine in 5.5" scale. Special thanks to John DiMaggio for not only the use of his ultra fancy Revopoint Mini scanner, but also taking the extra effort to layer multiple scans together to provide the best possible starting model for this experiment.
And of course, extra special thanks to whichever 3D artist modeled the original Gravis sculpture my remix is based on. Unfortunately, the magazine that came with the Eaglemoss figurine did not provide any sort of artist's credit, but I do want to be perfectly clear an upfront that this is a remix of another artist's work, and not a fully original creation. (And also absolutely not to be sold under any circumstances!)
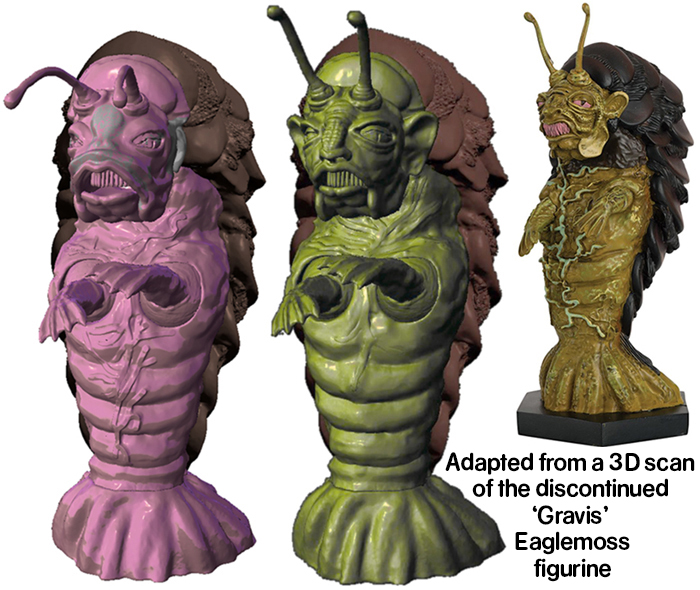
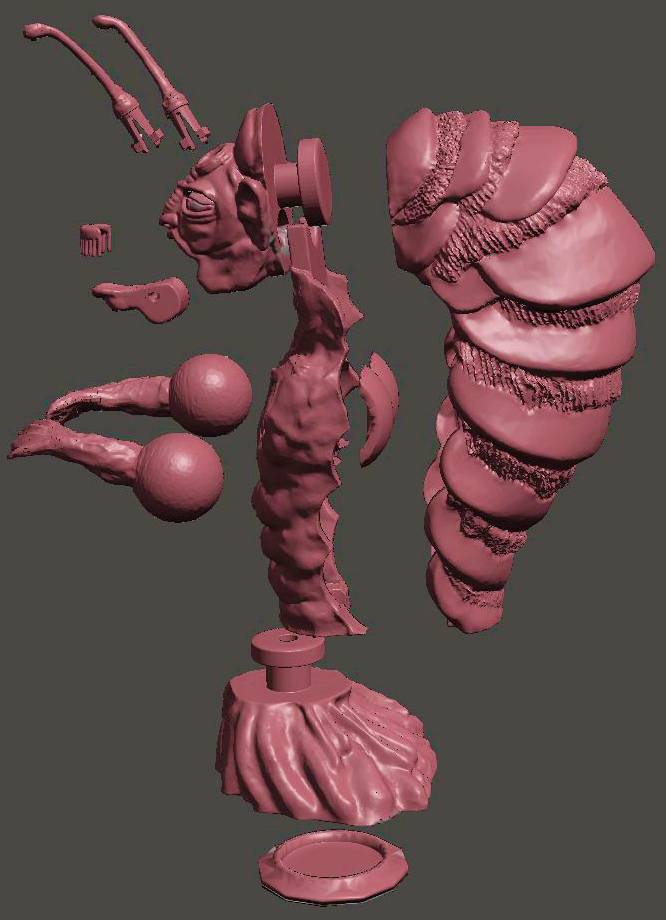
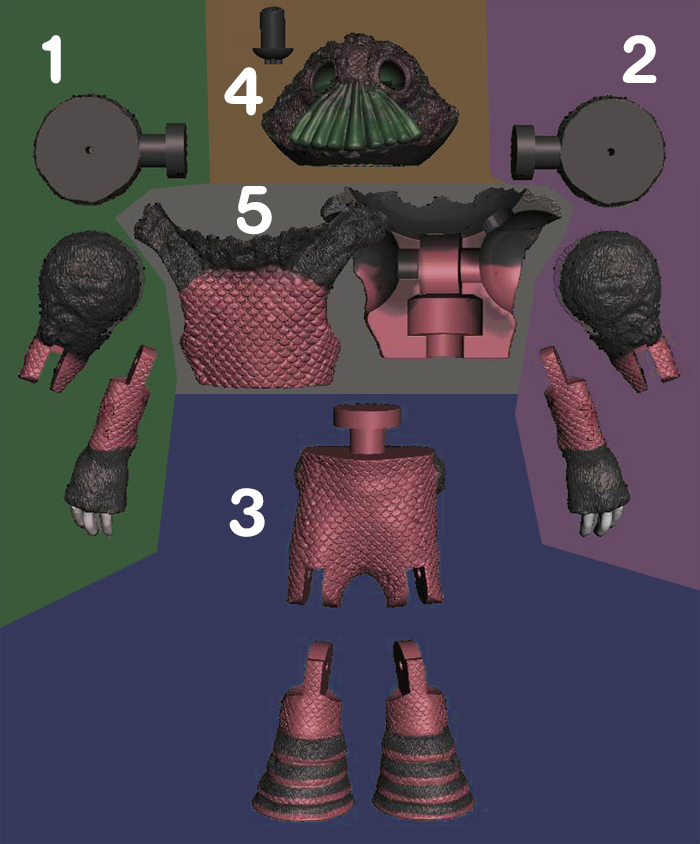
Print Recommendations: Each STL file is clearly labled for use for the Tractator, Gravis, or Tractator and Gravis. Both figures use the same Back, Foot, Bottom Foot Plug, Internal Arm Socket Cover, Hands, and Mouth Insert, so if you want to print both, you'll need to print each of those parts twice.
You can also combine the Tractator ONLY face and jaw with the Gravis ONLY chest and antenna to
create a 3rd Tractator variant for army building. (If you want to get fancy, you could also try mirroring the chest, back and foot)
Both figures are primarily designed for SLA (resin) printing, but should be printable out of PLA (filament). If you are going to print using filament, I recommend using PLA+/Flex PLA for improved surface detail and stability, and you might want to spring for a roll of TPU for the antenna if you want them to be properly flexible.
For SLA resin printing, the Antenna and Mouth Insert should be printed out of a minimum 50/50% mix of standard
ABS-like and a special flexible
resin like 3DMaterials SuperFlex or SirayaTech Tenacious. Without flexible resin as an additive, these parts may break off or not function at all.
The Mouth Insert is optional and somewhat tricky to print. If it doesn't print correctly or comes out too fragile, you can simply glue thread, dental floss, or anything else thin and stringy to the upper pallet of the head to create your own hanging mouth tendrils.
Likewise, the Bottom Foot Plug is purely cosmetic and only there to seal the bottom of the figure. It should stand up perfectly fine without it.
Before you paint and assemble your figure(s) it is recommended that you fit all parts except the antenna together without glue to make sure all points of articulation slot into place and move correctly. You may need to sand down some parts or drill out holes if pieces do not move freely.
The antenna are designed to lock in place once you push them into the holes, so be aware that once you pop them in there, there's no getting them out again without breaking the figure.
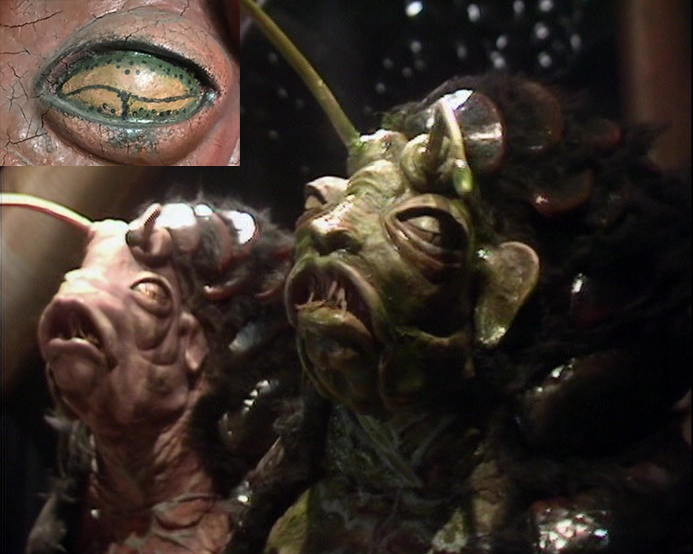
Color Recommendations: The Tractators are a greyish salmon pink with dark mahogany colored shells separated by black or extremely dark brown fur. The veins on their chest and hands were painted using photoluminous paint that was supposed to glow for the camera, but this effect only worked in a handful of scenes and mostly they came out looking concrete grey. The Gravis has a similar pink base coat, but has a sickly green top coat over the top of that.
The eyes are golden yellow with a black T-shaped iris and black specklied outer edges.
The tips of the Gravis' antennas are a translucent yellow/green (possibly they were meant to light up?) whereas the regular Tractators were standard pink.
Assembly: Assembly is the same for both the Gravis and Tractator models.
After painting, push the hands through the holes in the back the chest and glue the Internal Arm Socket Cover in place to lock them into their ball sockets. Make sure this part is dried completely before your attempt to seal the rest of the torso.
You can also glue the Bottom Foot Plug to the bottom of the Foot.
Attatch the Mouth Insert (or glue in whatever thread you're using as a substitute) to the upper pallet of the head. Then attach the Jaw using a 1.5mm wide brass rod trimmed to just a couple of mm shorter than the depth of the hole. I prefer the brass rods because they're incredibly sturdy, but you can always use a toothpick or bit of coat hanger in a pinch.
Rest the T pivot of the Face on the top indentation of the Chest and then hook the Back over the top of the T pivot. There should be enough wiggle room before you permanently glue it that you can insert the T-pivot of the Foot in from the bottom and then close the clamshell around it. If not, you may need to sand some parts down. With the pieces in place, glue the front and back of the body together, taking care to allow the head and foot to rotate freely.
The last step should be attaching the two Antenna, which are the most fragile part of the figure. If you printed these out of flexible resin, you should be able to carefully pinch the tips together and insert them into the holes (try not to twist them when doing this. If they simply won't fit, you may need to trim them down or carefully expand the holes.) Once in, wait a minute for them to expand back to their
original shape, and they should be locked into the sockets permamently.
|
|
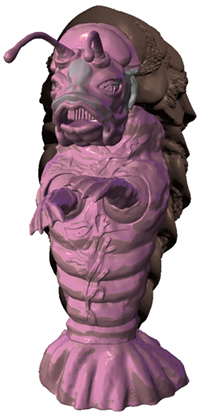
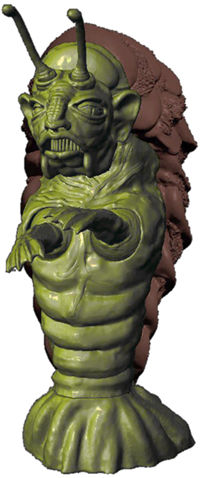
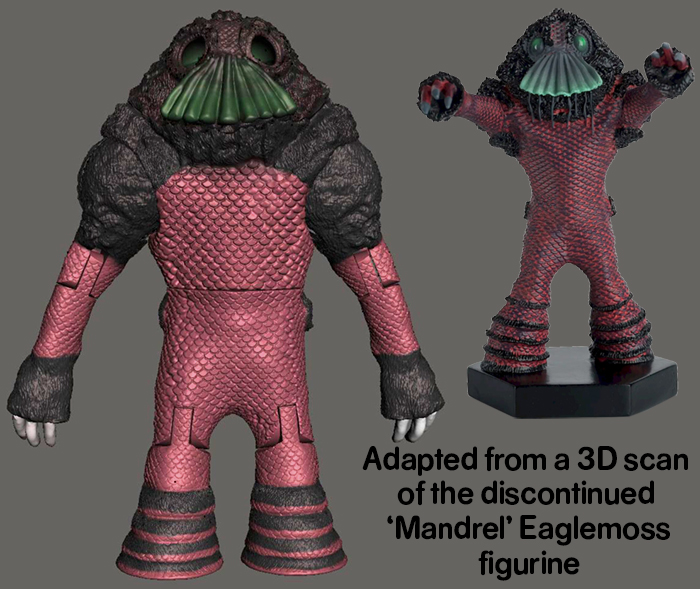
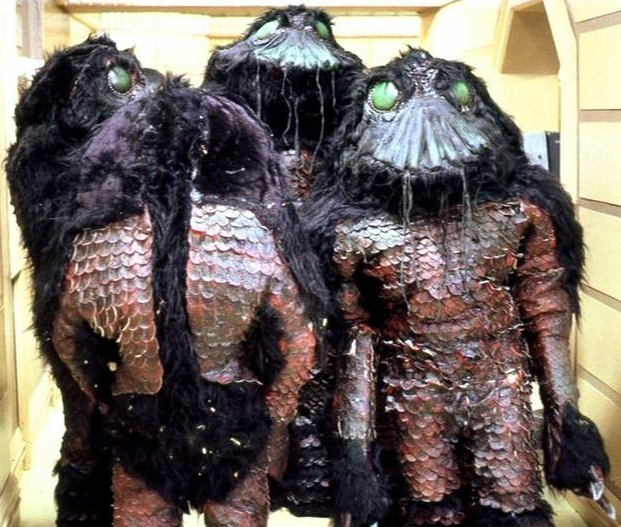
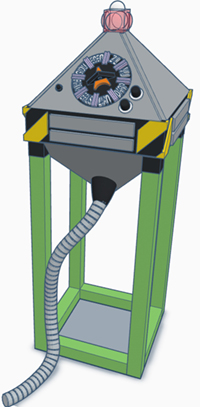
REMIX006 - Mandrel and CET Machine
Adapted from the Eaglemoss Mandrel figurine (no longer available)
Original Mandrel design by unknown
3D Scanned by John DiMaggio
Remixed by Troy Ryan Wood
Version 1 - Updated 8/1/2023
Beta: https://drive.google.com/file/d/11AJaSHHUkKyXB3Y2GYlPZmr2JREm9hHn
Notes: This was our project's second attempt at using a 3D scanner to reproduce an existing Eaglemoss figurine in 5.5" scale. Special thanks to John DiMaggio again for providing these scans, and of course, extra special thanks to whichever 3D artist modeled the original Mandrel sculpture my remix is based on. Unfortunately, the Eaglemoss magazines did not provide an artist's credit, but I do want to be perfectly clear an upfront that this is a remix of another artist's work, and not a fully original creation. (And absolutely not to be sold under any circumstances!)
Additional Parts & Supplies: This figure requires at least one 1.5mm wide brass rod to be trimmed to length for the shoulder, elbow and knee pivots. These craft rods can be found online or in most craft stores that have a model airplane section. Alternatively you can use a thin wire coat hanger, but you may need to widen some of the holes prior to final curing with a drill. )
This figure also includes an optional light up feature that requires the off-the-shelf purchase of a 2x2 LED brick. If you are not using the light-up feature, you can fill in the button hole on the back of the head and space for the LED brick with craft resin/putty/etc.
Print Recommendations:
Both The Mandrel and CET Machine figures are primarily designed for SLA (resin) printing, but can be printed out of PLA (filament). The files used are the same for both materials.
If you are filament printing I recommend using PLA+/Flex PLA for improved surface detail and stability, and if you are SLA resin printing, I recommend using at least a 20% mixture of flexible resin like 3DMaterials SuperFlex or SirayaTech Tenacious for added durability, especially on the arms and CET Machine base. Without flexible resin, these parts may break off if dropped or played with.
The CET Machine comes with multiple optional parts.
If you are printing out of PLA it is recommended you print the Top for Sticker and then print the dial sticker jpg as a 15mm wide sticker using sticker paper and a high quality printer, or a sticker-printing service.
If you are using PLA+/FlexPLA you can try printing the Top for Dial and Dial (raised) though the lettering may or may not be visible.
If you are printing out of SLA you can print the Top for Dial and then, if you have black resin, you can print Dial Recessed and use the "paint and wipe" method to fill in the recessed lettering with a white paint pen. Otherwise, you can print the Dial (raised) and then attempt to very lightly brush the tops of the raised letters with white paint.
Pre-Painting Instructions: Before painting, it is recommended that you fit all parts loosely together without glue to make sure that they fit and move freely. You may need to sand down some parts or drill out some holes if they are too tight or don't fit together smoothly.
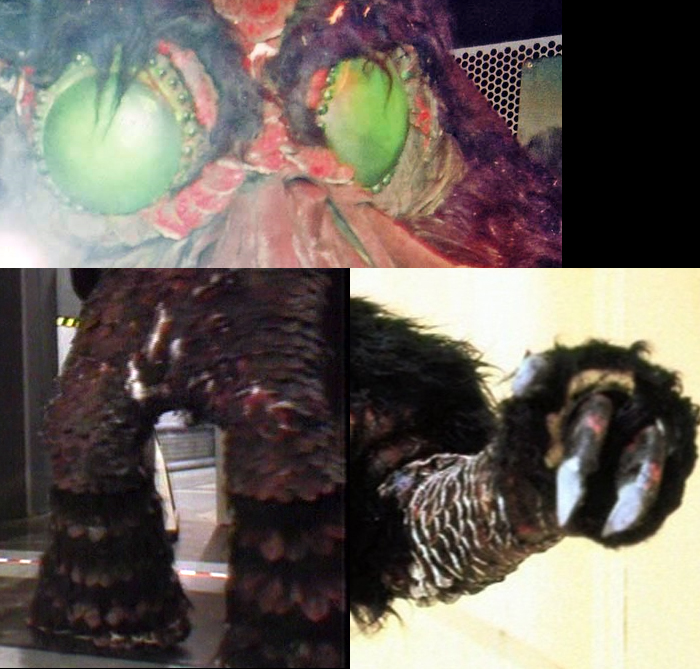
Paint Instructions: The Mandrel's scales are a dark mahogany red, and the fur is black. The tubed "snout" area is tinted green, especially down towards the bottom.
The circular area directly around the eyes and the small bumps are gold.
Th eyes themselves are transparent green (do not fill these in until you get to the assembly instructions)
The claws are a mix of black and mahogany, except for the tips of the claws, which are light grey.
The feet are mostly black hair with four single rows of scales poking out in concentric circles. (Do not refer to the Eaglemoss figurine as a painting guide here since they got the scale and fur sections reversed)
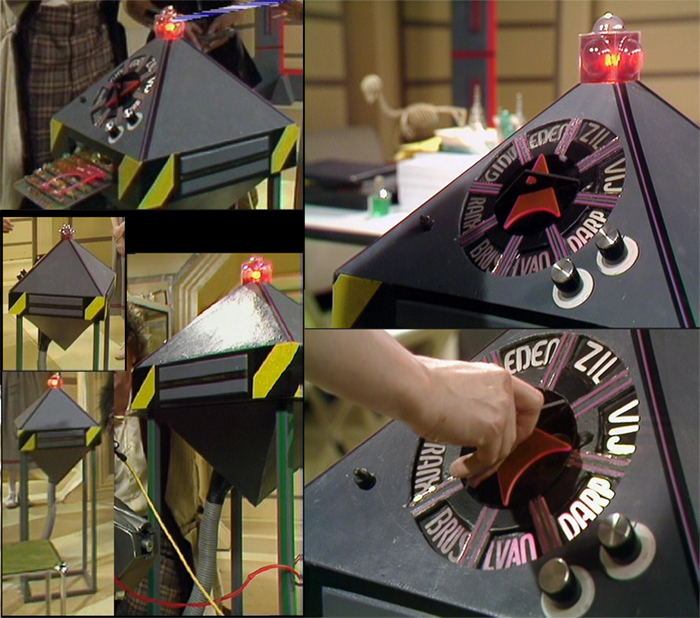
For the CET Machine, the main diamond area of the machine is a flat battleship grey. The corner indentations are black but with a very thin purple line running up the middle the same color as the outer edges of the dial separators.
The center section of the machine has alternating black and yellow caution stripes on the corners.
The square light on the top of the box is transparent red except for a white tip. The pointer tip is a translucent neon orange, and the dial lettering is silver or white depending on illumination. The small button on the left side of the controls is solid black, the two dials on the right have white bases, black dials, and silver dial tops.
The legs of the machine are industrial tractor green. The corrugated hose that connects up to the bottom of the machine is grey, except for the very top, which is black.
Assembly: For the Mandrel, assemble the arms and legs first by taking your 1.5mm wide brass rod and snipping it about 1-2mm shorter than the hole. you can then seal the open end of the hole with UV craft resin, glue, or sculpter's putty to seal the rod in place.
If you are going to be using the 2x2 LED brick, insert the button into the top of the head, and then slide in the brick so that the LED is facing forward towards the eyes. Test the button is working then glue or tape the brick in from the bottom so it does not slide out.
You then need to fill in the eye sockets almost to the rim with
Clear UV craft resin (recommended) though you can also use clear caulk, E6000 type glue, or hot glue in a pinch. Try your best to avoid creating bubbles or empty pockets. Allow this to cure/dry/set and then mix up some craft resin/glue with a tiny bit of green resin dye, food coloring, or green sharpie ink. Use a craft syringe to carefully fill in and round the lens of the eye. This should appear dark green when unlit, but light up and glow when you press the button on the head.
Finally, lock the shoulders and waist in place with the two halves of the chest clamshell and then glue the head onto the completed body.
|
|
|