047 - Nucleus of the Swarm
From The Invisible Enemy (1977)
Version 1 - Updated 1/1/2025
Finished: https://drive.google.com/file/d/1mGv1Zkc6sSfVXe4Gk_I5tvM91_wZ0LPZ

The files used to print this figure are the same, regardless of whether you are printing in PLA (filament) or SLA (Resin) though ifyou are printing out of resin, I recommend using at least a 20% mixture of flexible resin like 3DMaterials SuperFlex (preferred, if you can get it) or SirayaTech Tenacious for added durability. Without flexible resin, some smaller parts may break if dropped or played with too hard.
You may also want to print out of a transparent resin, since it looks like some parts of the costume (mostly the head and claws were semi-transparent to begin with.
This figure comes with two alternate Left Lower Arms:
A regular version where the claw is in the same orientation as the other three claws, and a "flipped" version where it is pointing downward.
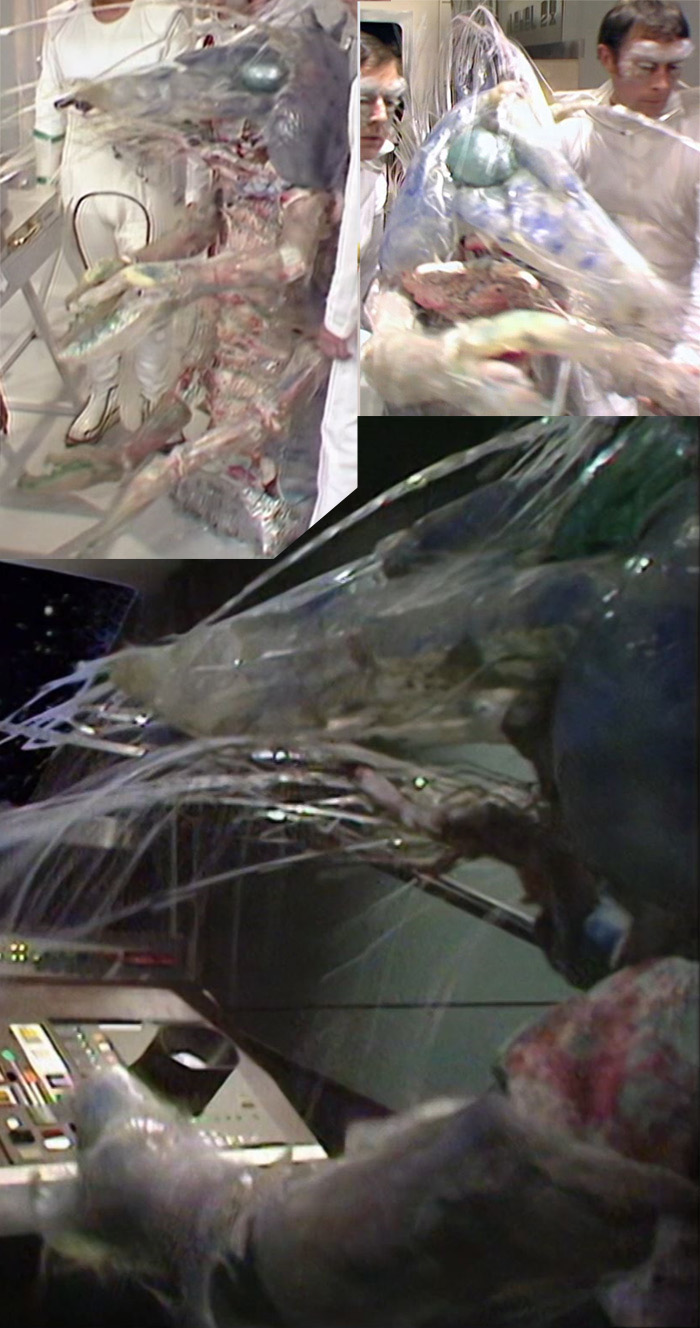
Although only seen briefly during the final episode of The Invisible Enemy, the costume was already falling to pieces as they were filming it, and in some scenes (and most of the publicity photos) this arm can clearly be seen hanging limply at the incorrect angle, probably because the fishing line holding it in place had snapped, so this alternate version is an attempt to look more "screen accurate" even if that also means extremely poorly made.
You will need to print 4 copies of the shoulder joint part and 4 copies of the pincer part. (These are the same, no matter which version
of the lower left arm you use.) If you are using a print-to-order service, make sure this is clearly explained or that you include 4 copies of each STL file when you send it off to request your quote.

This figure requires at least one 1.5mm wide brass rod to be trimmed to length for the shoulder and jaw pivots and one 1mm wide brass rod for the pincers.These craft rods can be found online or in most craft stores that have a model airplane section. Alternatively you can use a thin wire coat hanger for the 1.5mm rod, but you may need to widen some of the holes prior to final curing with a small hand drill. A thumb tack that you've snipped to length also works fine as a replacement for the 1mm rod.
You will also want some form of cheap fiber optic strands to use for the antenna/feelers. The thicker the better. The kind used in light-up wands for kids birthday parties or weddings are okay, but most of these I've seen tend to have very thin strands that are only about 0.3mm thick, which is about the minimum thickness that's useful. If you can find thicker ones that are about 0.5mm to 1mm thick from an old novelty desk lamp or fiber optic toys from the 90's, you'll get better results.


Before painting, it is recommended that you fit all parts loosely together without glue to make sure that they fit and move freely. You may need to sand down some parts or drill out some holes if they are too tight or don't fit together smoothly.

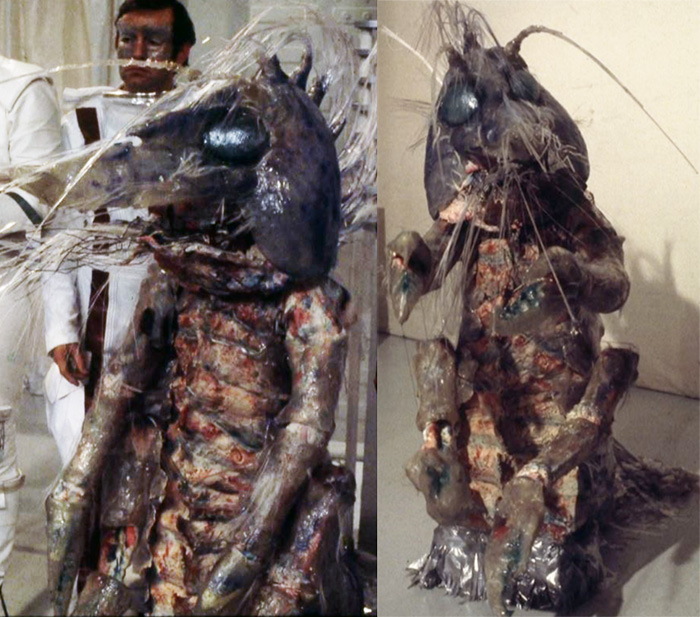
Color reference for the Nucleus costume is a real pain because it looks completely different at different times within the same episode. Sometimes it's extremely light colored and semi-transparent, and other times it's much darker.
In these lighter shots, the head and arms are a transparent iridescent pearly-white sprayed with blue accent spots. The eyes are a shinly iridescent green (as are the inside of the claws) and the mouth and chest area are a lighter pink with occasional dark red patches. The colorization was quite clearly based on that of the ghost or glass shrimp and microorganisms like hydras and tardigrades.

As to how the costume turned from it's light variant to it's darker colored variant within the same episode, my suspicion is that whatever iridescent material they were using for the outer skin literally baked and darkened under the hot studio lights (it certainly looks almost barbequed in the shots below) or they filmed most of the scenes on the asteroid and hospital hallway sets, then got to the CSO sequences and realized that a transparent monster didn't show up proplerly, so they ended up breaking for tea and spraying the costume down with something to darken it.
The darker version still has a very similar colorization, but the blue accents around the cheeks and nose are now grey. The chest is a darker flesh tone, with "meaty" dark red and accents that look similar to grilled chicken, and the once transparent claws are nose are now a yellowed color, similar to that of plastic that has been left out in the sun.
The "legs" of course, look like cheap silver garland strips because that's exactly what they were.


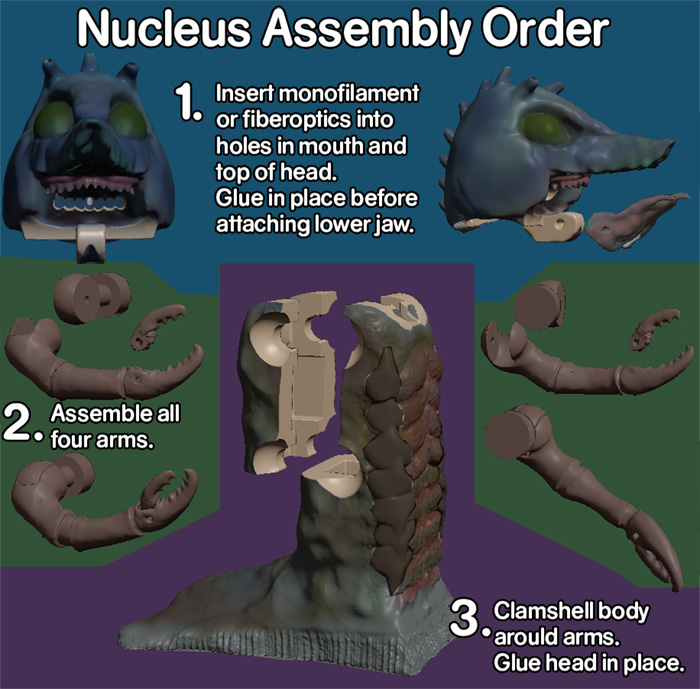
Assembly is comparatively easy, though gluing the fiber optic strands into the head is a massive pain. I recommend starting with the mouth first since that's the hardest part to access.
Cut several strands of about 4 to 5" in length, then bundle them together into bundles about 2.75mm thick. You can try melting the ends of one of these filament bundles with a lighter to see if you can fuse them into a solid lump, then quickly shove the bundle through one of the holes in the mouth. If this doesn't work, you might want to try crazy glue or dipping them in UV resin.
Once you have the mouth full, start on the top antennas and "mowhawk". Note that the antenna directly above the eyes are fused together into solid bundles. You might want to try a tiny bit of clear craft glue or E6000 to stick the strands together and force them into a solid curved shape.
Once you have all antenna in place,
if you're worried about them falling out, try filling the inside of the head with hot glue to help hold them in place.

Next you'll need to attach the lower jaw using your 1.5mm wide brass rod. Snip the rod about 1-2mm shorter than the hole. You can then seal the open end of the hole with UV craft resin, glue, or sculpter's putty to seal the rod in place.
Then repeate this process for the shoulder joints using the same 1.5mm wide brass rod and the 1mm wide brass rod for the pincers.
Once all four limbs are assembled, insert the T-plugs into the body and glue the back in place to lock them into their sockets.
If you printed the alternate downward facing claw, make sure it gets inserted into the hole on the bottom right (his left.) Make sure that all shoulders spin freely and did not get any glue on them.
Finally, glue the head in place on top of the body and touch up any paintwork as needed.

Coming soon.
|