052 - Karfel Android & Bandril
From Timelash (1985)
Version 1 - Updated 4/1/2026
Beta: https://drive.google.com/file/d/16cKrQ3TqLWywriwjOeuwGKciDt3UjNRr
Note: Make sure you download the full zip file. Google drive preview only shows 16 of the 24 files.

This Timelash Twin-Pack was my annual April Fools Day figure for 2026. Parts of both figures were created using MakerWorld's ImageTo3D app (using production photos of the original actor and puppet prop as a source), and then heavily modified over the course of two months in Meshlab and TinkerCAD to create the finished versions you see here.

The files used to print this figure are the same, regardless of whether you are printing in PLA (filament) or SLA (resin)
The tubes attached to the Karfel Android shoulders require either a flexible resin or filament like TPU to function properly. If you print them out of something rigid, they will almost certainly snap before you get the figure fully assembled. If you do not have access to flexible resin or TPU you can try printing the optional shoulder with notch for arm tubes pieces and then instead of printing the separate arm tube, create something similar yourself using plastic tubing, wire, or flexible clay.
It is also highly recommended to print the gun accessory out of flexible resin, as it is very thin and fragile, and it will be much easier to get it over the arm if you can pinch and flex it.
I recommend using at least a 20% mixture of flexible resin like 3DMaterials SuperFlex (preferred, if you can get it) or SirayaTech Tenacious as a strengthening agent for all other parts for
added durability. Without flexible resin, smaller parts may break if dropped or played with
too hard. If you are printing out of PLA, I recommend buying PLA+ which will give you better
overall surface detail.
Note that while the arms of the figure are symmetrical, so you can mirror the right and left ones to save time in your slicer, the right and left upper legs are very slightly different, so you will need to print each of those pieces separately rather than flipping them.
The Bandril figure comes with an alternate flat base, If you only want to display the head (which was the only part of the Bandril shown on camera) rather than the tail base, which takes some artistic license imagining what the rest of the body might have looked like.

This figure requires the following off-the-shelf parts for assembly:
Two ball pins or insect specimen pins for the shoulder microphones. If the pin heads aren't perfectly round, you can dip them in a small blob of UV craft resin to make the ends more spherical.
At least one 1.5mm wide brass rod to be trimmed to length for the shoulder, elbow, knee, and hip pivots. These craft rods can be found online or in most craft stores that have a model airplane section. Alternatively you can use a thin wire coat hanger, sturdy piece of craft wire, or even a toothpick but you may need to widen some holes prior to final curing with a small hand drill.

Before painting, it is recommended that you fit all parts loosely together without glue to make sure that they fit and move freely. You may need to sand down some parts or drill out some holes if they are too tight or don't fit together smoothly.

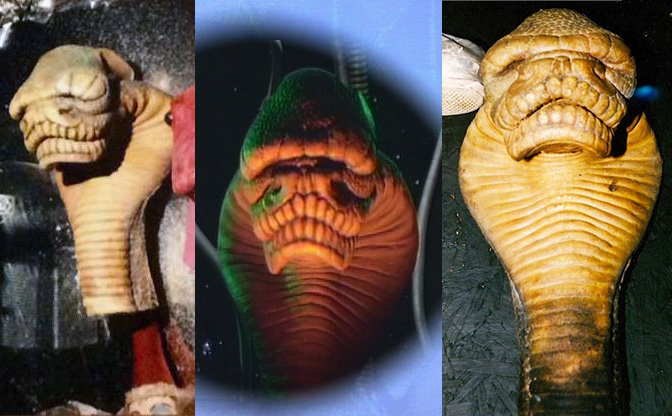
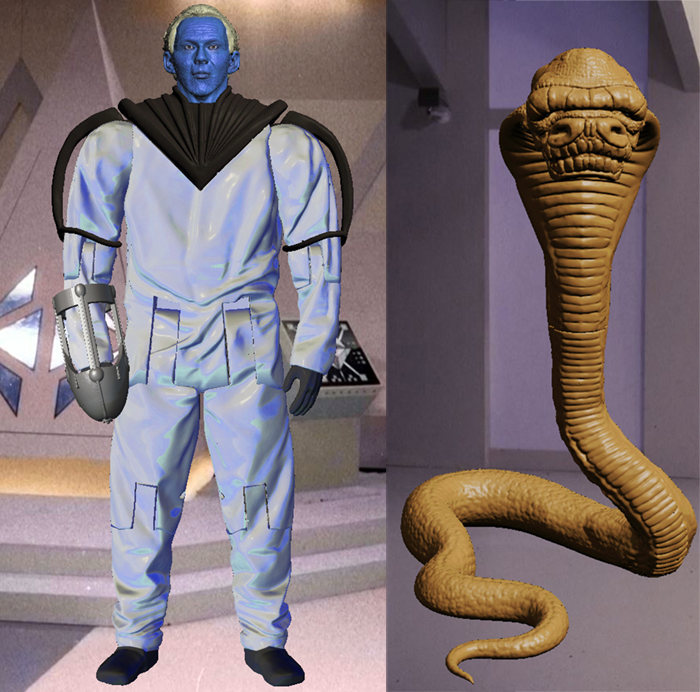
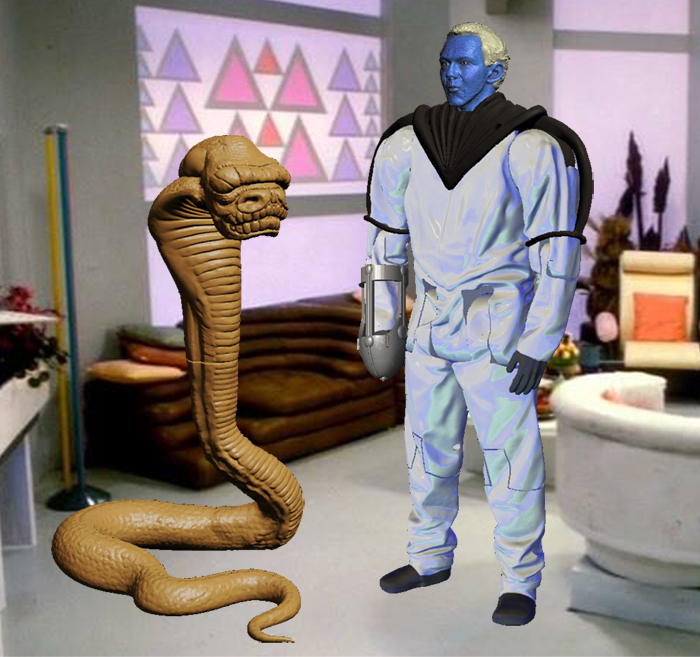
The Bandril puppet was a yellowish-tan foam color, though for its brief on-screen video link appearances, it was lit by orange and green gel lights. The photo on the far right shows the puppet with unfortunate smoke and fire damage from the Longleat fire, although it has since been restored and is now safely residing in a fan's private collection.
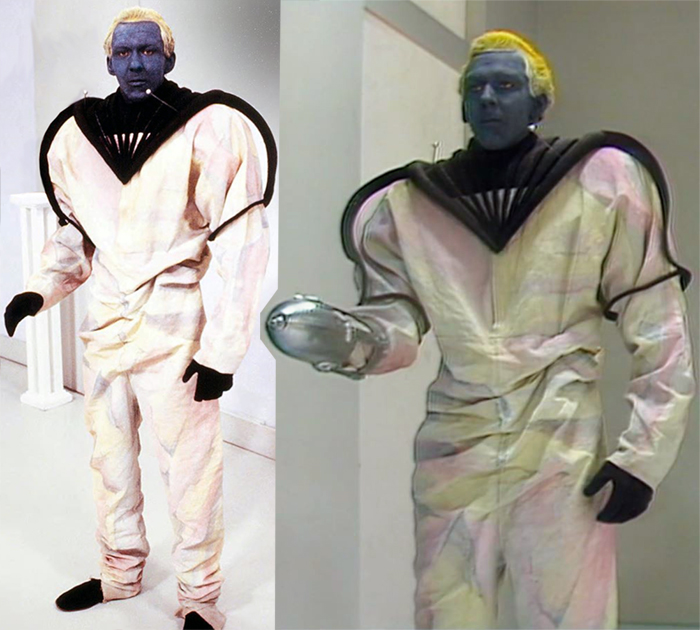
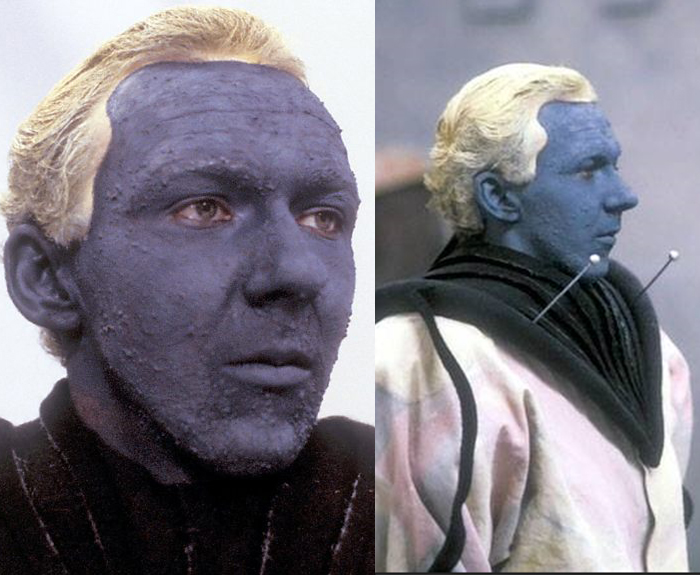
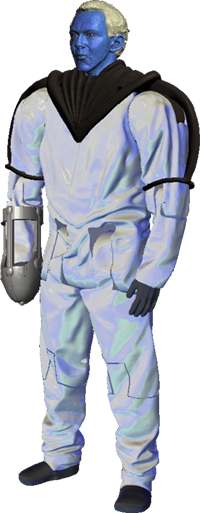
The Karfel Android is wearing a very strange costume which appears to have been made out of lightly tie-dyed bedsheets. While it's mostly white, there are very light streaks of pink and blue or grey mixed in. It has black gloves and Chinese style slip-on shoes, though the pants extend down and cover the heels. The upper shoulder section is covered by a triangular mantle. This is mostly black, but the bottom part of the triangle has a silver section in-between the black slats. Note that the triangular area on the back of the costume is 100% black. The two antenna/microphones are a dull silver. (Remember that the Borad loathes shiny surfaces, so the entire costume has a matte finish.) The weapon is the only semi-reflective part of the costume.
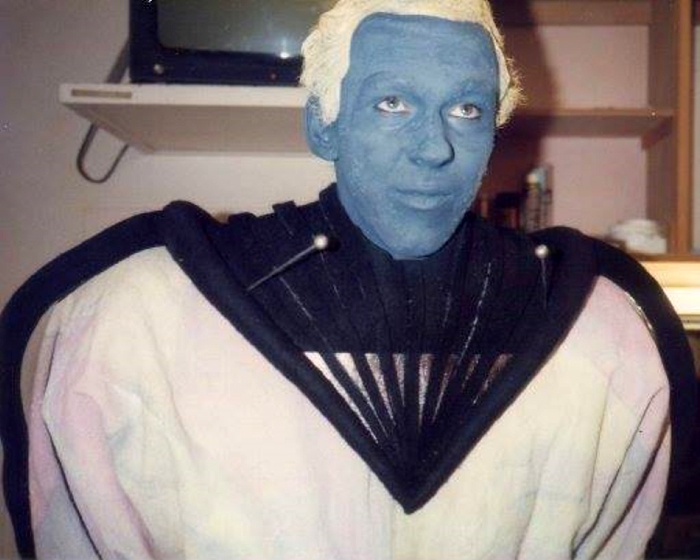
The Android's face is blue, but a tiny bit of pink does show through around the eyes. For some unknown reason, they decided to give it a skin condition. The hair is supposed to look somewhat fake and painted on like an Action Man figure, so note that the pale-yellow parts extend past the natural hairline and cover some of the surrounding skin area as well.

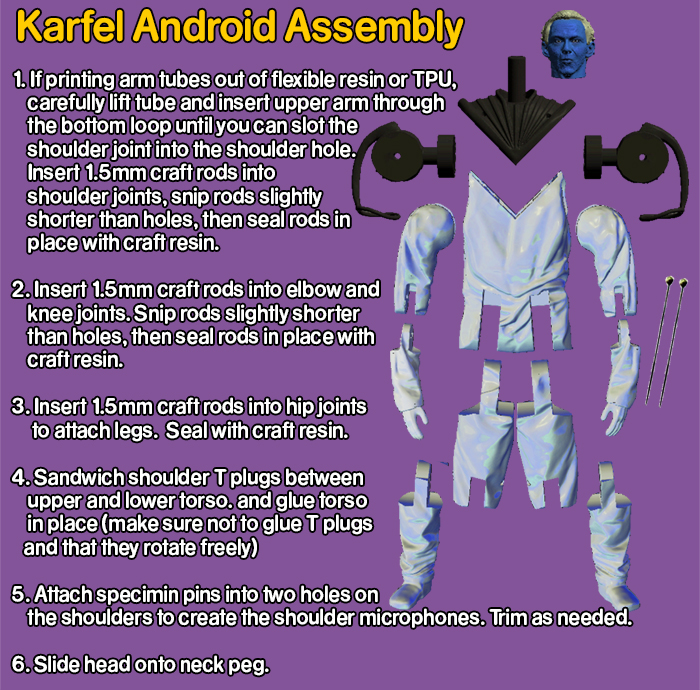
If you printed the single piece shoulders out of flexible resin or TPU, you will want to begin by gently bending the flexible tube part and inserting the bottom end of the upper arm through the loop and then allowing the top point of the upper arm to align with the T-plug part of the shoulder.
If you printed the separate Arm tube, you will still want to put the loop part over the upper arm before you insert the rod for the elbow joint.
Insert your 1.5mm wide brass rod into the shoulder holes. Snip the rod about 1-2mm shorter than the hole. You can then seal the open end of the hole with UV craft resin, glue, or sculpter's putty to seal the rod in place.
Then repeat this process for the elbows and knees.
Once the legs have been fully assembled, do the same for the hip joints. (It will be very hard to insert the rods into the knees if you do the hips first.)
Once all four limbs are assembled, insert the T-plugs for the shoulders into the lower torso and then glue the upper torso in place to lock them into their sockets.
Make sure the open front of the collar is facing forward, and that the shoulders rotate freely in their sockets and did not get any glue on them. Note that because of the arm tubes, you will not be able to raise the arms to the full upright T position. That is okay, because the guy in the android costume couldn't either.
Finally, attach the head onto the neck peg, but do not glue it in place. The head should remain in place due to friction alone. If not, you can try adding a small amount of tape or silicon Plasti-Dip to the neck peg. If you want to get extra fancy, you could try printing two heads and make one of them the burnt out version from the Morlocks caves.
Finally, insert some ball pins into the holes near the top of the shoulders (you might need to snip them to length)
and then glue them in place to create the shoulder antenna/microphones.

COMING SOON.
|
 |