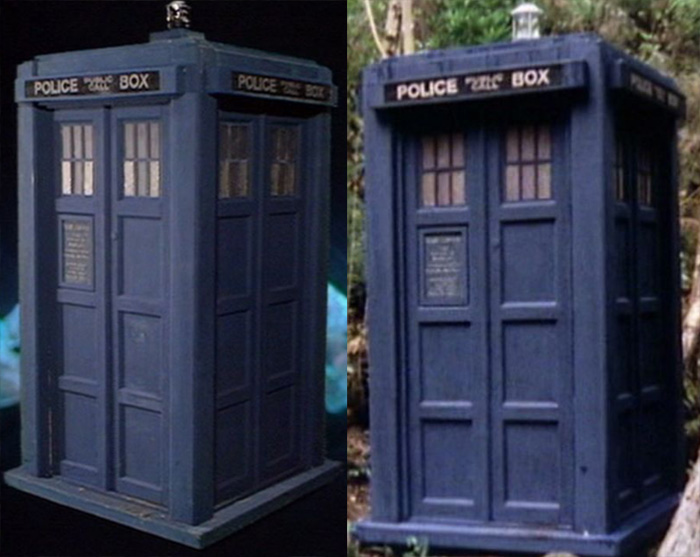
023 - "Newbery" Season 14 TARDIS
From Season 14 (1976 - 1977)
Version 2 - Updated 8/25/2025
Beta: https://drive.google.com/file/d/1DnQ-WhuTrkJw3wm0Uc1Cj908Yx04rqxd/

My original season 12-17 "Newbery" TARDIS template was removed from circulation in 2019, since Character Options released their own Season 17 'Shada' TARDIS as part of their 2019 B&M toy run.
However, it has been 6 years since that figure release, so I've rereleased this one minus the optional Season 12 and 17 parts, since technically, Character Options have never released a Season 14 variant with the white lamp. It seems inevitable that they will do so at some point in the future though, since it's practically the only TARDIS variants they haven't released, so expect these files to disappear again whenever that happens.

he files used to print this figure are the same, regardless of whether you are printing in PLA (filament) or SLA (Resin) though if you are printing out of SLA resin, I recommend using at least a 20% mixture of flexible resin like 3DMaterials SuperFlex (preferred, if you can get it) or SirayaTech Tenacious as a strengthening agent for added durability, especially on the left and right doors, door levers, and light base. It is also preferrable if you can print the windows and light out of transparent resin. If you are printing out of PLA, I recommend buying PLA+ which will give you better surface detail and durability.
This figure comes with several alternate files depending on whether you plan on including a single LED keychain light for the roof, if you want to print the base with door levers, and if you want to print the left door and roof base with pre-engraved lettering for the Police Box Signs or print stickers (also included). You also have the option of printing the Police Box Sign and Door Sign separately, if you wish to paint these items separately and glue them on later. The two door levers and engraved version of the left door are unlikely to print properly out of PLA, and may or may not work out of PLA+
Note that you must print out 8 copies of the the TARDIS Window, 3 copies of the TARDIS Wall, and 2 copies of the Door Lever (if you are printing that version.)
Also note that the doors and side walls are quite thin, and this makes them prone to warping/curling. If printing out of PLA, you'll get the best results if you print them flat on the build plate, or better yet, on
a borosilicate glass plate. For SLA, you may have to play around with orientation and supports to figure out the best angle that gives you nice straight walls and doors. Nearly vertical is usually best, but this can be tricky to support. If you print flat on the build plate, you may experience some "elephant foot" around the outer edges if you do not adjust your bottom layer exposure time to compensate or turn on Bottom Tolerance Compensation (though I have never gotten this feature to work completely satisfactorily myself.)

This figure requires no off-the shelf parts for assembly. But you have the option of using a single LED keychain light to illuminate the lamp at the top.
There are also two optional Police Box sign stickers (which comes in both black and a faded grey) and a Door Sign Sticker, which you can print on sticker paper at the size indicated in the filename. (I presized the JPGs to print at 300dpi on a laser printer, but I know from experience that you will probably need to resize them manually.) If you are going to print stickers, make sure to print at least four copies of whichever Police Box sign you end up using.
Before you paint or assemble you TARDIS it is recommended that you put all pieces together without glue to make sure that all parts fit together and the doors open and close smoothly. If the door does not open and close freely, don't force it. You may need to carefully sand down some parts or drill out some holes using a manual hand drill, but typically not more than about 0.5 mm.

Before you paint or assemble you figure it is recommended that you put all pieces together
without glue to make sure that all points of articulation move smoothly throughout their
complete range of movement. If a part does not rotate/swivel freely, don't force it.
You may need to carefully sand down some parts or drill out some holes using a manual hand
drill, but typically not more than about 0.5 mm.

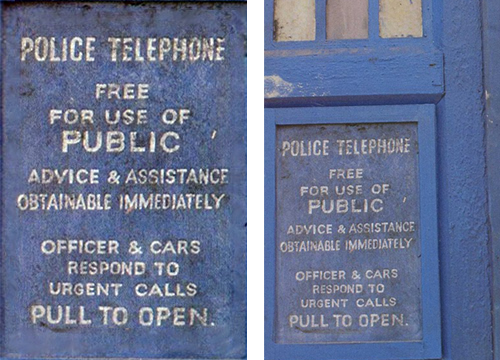
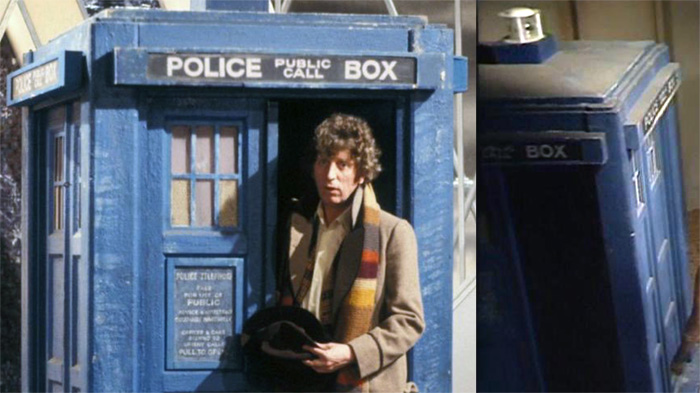
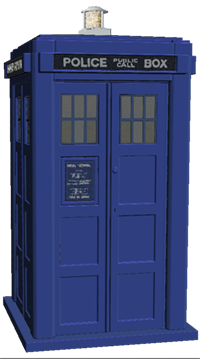
The Season 14 Newbery TARDIS is most notable for it's white fresnel lantern and distinctively worded door sign which says "officer & cars" rather than the more common plural usage found on most other exteriors.
The sign tends to be a slightly darker shade of blue from the rest of the box.
The Police Box topper appears dark black with white lettering throughout the majority of season 14, but started to fade to a lighter chalkboard grey clolor in Robots of Death and later seasons. The windows too, started as a much lighter color, where the bottom left and bottom right panes were a pearly white, which turned dark yellow by the time the prop got to season 17. The upper and middle pane were a darker greyish color with just a hint of red.
The box interior remained flat black, and the edges and corners of the box often appeared slightly scuffed as the prop aged. In Robots of Death, the right side windows appear to be trimmed with white, though this does not apepar in other episodes so it might have been a hasty repair, or just a part of the box that was worn and needed repainting going into season 15.

Begin by gluing the eight TARDIS windows into the TARDIS walls and doors.
Next, identify the front edge of the TARDIS Base and TARDIS Posts and Roof Base (this will be the edge with the two holes near the corners for mounting the doors.) Insert the left and right doors into the peg slots. then slot and glue the other three TARDIS walls into place, being careful not to accidentally glue the doors shut.
If you are using a
single LED keychain light to illuminate the lantern, insert the LED button it into the hole of the TARDIS Roof with LED Button Hole and then insert the keychain light into the hole in the roof with the button on the keychain facing towards the button in the roof. Sandwich the roof and roof base together, verifying that the light triggers properly when you press the button before you glue all the parts together.
Finally, insert the light, light base, and light top together into the square hole on the top of the roof.
Attach the door levers to the underside of the TARDIS (if they printed correctly) and affix any stickers if you chose to go that route.

Coming soon.
 |
 |